The wall to hold up the lean too roof
 IMG_4912 by Dennis Rayon, on Flickr
 IMG_4913 by Dennis Rayon, on Flickr
 IMG_4915 by Dennis Rayon, on Flickr
 IMG_4914 by Dennis Rayon, on Flickr
The wall to hold up the lean too roof
IMG_4912 by Dennis Rayon, on Flickr
IMG_4913 by Dennis Rayon, on Flickr
IMG_4915 by Dennis Rayon, on Flickr
IMG_4914 by Dennis Rayon, on Flickr
Fence made from Redwood all cut on tablesaw
Drag thin boards backwards on a bandsaw makes a nice way to cut edges to look uneven/rotted.
 IMG_4911 by Dennis Rayon, on Flickr
Hey Dennis. I just happened on to your build. Fantastic modeling (as usual). Will using the PB replace your famous Magic-Sculp process of the past? Just wondering. And thanks for posting.
Sorry, double post.
Gad I learn a new valuable technique every time I look at one of your builds! I love it! Nice job Dennis!
Peter Lewitzke said:
Hey Dennis. I just happened on to your build. Fantastic modeling (as usual). Will using the PB replace your famous Magic-Sculp process of the past? Just wondering. And thanks for posting.
Thanks Peter
Wont replace the magic sculpt, but it will reduce the use of it, this is quicker.
Dennis
Thanks Jim, I appreciate the compliments
Dennis
Beautiful as always Dennis.
Dennis, super build!
Making Redwood Shingles
I am making shingles this time with the table saw. I have done them in different ways, I actually made a shingle splitter, that works
very well, but I like this way the best. I purchased a thin kerf blade to save a little lumber. It cuts very nice, and smoothly. I will cut 3 different thickness, about .050-.060-.070, these will give a very authentic look . Then I take a wire brush on a cordless drill and wire brush the wood as pictured. Quick and easy.
 IMG_4882 by Dennis Rayon, on Flickr
Then I stack the three different thickness in no order, using masking tape and wrap it in a spiral as pictured. Then I set the fenceon the bandsaw to 1" and crosscut the complete stick. So I end up with many pieces taped together measuring 1" long and 1-1/2" wide.
These were cut from a 2’x6’ redwood board.
 IMG_4886 by Dennis Rayon, on Flickr
 IMG_4976 by Dennis Rayon, on Flickr
This is a couple packets of of cut shingles to be,
 IMG_4977 by Dennis Rayon, on Flickr
I used a cutter because I have one, I also just split many with my fingers and thumbs. With the cutters i do 4-7 layers
at a time.
Start Laying Shingles
I layout lines 1" apart for reference lines for me to follow how straight I am laying them.
 IMG_4889 by Dennis Rayon, on Flickr
The rectangle hole for the chimney
This side shingles all laid down
 IMG_4909 by Dennis Rayon, on Flickr
Now the first layer of the steel shim stock rolled through the home made crimper, I use steel so I get REAL rust.
This is my shear to shear the strips. can also be cut by a good pair of sizzors or tin snips could be used.
 IMG_4905 by Dennis Rayon, on Flickr
Then the Crimper
 IMG_4906 by Dennis Rayon, on Flickr
 IMG_4953 by Dennis Rayon, on Flickr
This is is Birds eye view of the roof, I treated the steel with a coating of Muratic acid and then spraying hrdrogen peroxide, that will activate rust affects immediately.
Then over night it is at the limit of rust i want, then I remove rust in places as seen in the picture, with the drill and wire brush, then spray with a clear coat to slow down
more growth of rust.
IMG_4953 by Dennis Rayon, on Flickr
Can see here the finished Chimney with a 3D printed chimney top
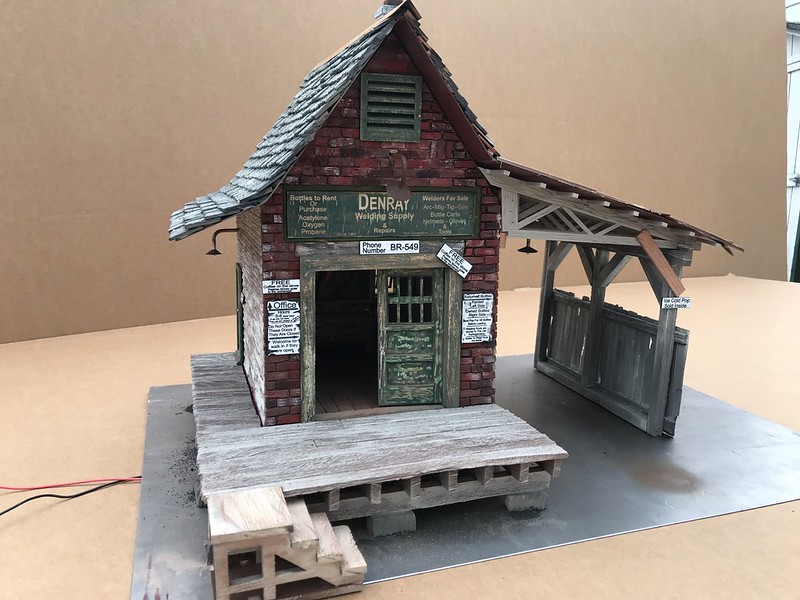
Finished Model Pictures
SIGNS
 IMG_E4930 by Dennis Rayon, on Flickr
The signs are made from 2 layered acrylic lasered and cut on a laser.
I used a dremel with a wire brush and fine sand paper , to slightly remove the top coating.
 IMG_4955 by Dennis Rayon, on Flickr
 IMG_4956 by Dennis Rayon, on Flickr
IMG_4956 by Dennis Rayon, on Flickr
 IMG_4945 by Dennis Rayon, on Flickr
 IMG_4949 by Dennis Rayon, on Flickr
 IMG_4951 by Dennis Rayon, on Flickr
 IMG_4959 by Dennis Rayon, on Flickr
 IMG_4965 by Dennis Rayon, on Flickr
 IMG_E4928 by Dennis Rayon, on Flickr
 IMG_4969 by Dennis Rayon, on Flickr
 IMG_4968 by Dennis Rayon, on Flickr

