Forrest Scott Wood said:
Gauge and talking derailments bring this to mind. YouTube suggested it yesterday. A friend has been to Train Mountain a few times but I have neither the health nor income to make the trip.
Tom Watson
Published on Mar 18, 2018
The old Train Mountain Safety Video has been replaced by this new version created in 2018 by 7idea Productions. This new 16 minute video is now the version that will be required watching prior to operating at Train Mountain.Forrest,
I just saw this youtube yesterday after I received my monthly newsletter from Train Mountain giving notice of the new safety video. Train Mountain is on MY Bucket List. I am a member, but have never had the privilege to visit with my equipment. On a railroad of this massive size, track work and turnouts standards are compulsory. I know the video said they have over 20 miles of mainline track (ACTUAL miles), I believe it is closer to forty miles now with another expansion due in the next year or two to finally get to 50 ACTUAL miles! IF you don’t have the means to re-rail your train, you COULD have about a four mile “walk” back to the main station to get help! AND when running at night, this hike could be “interesting” :).
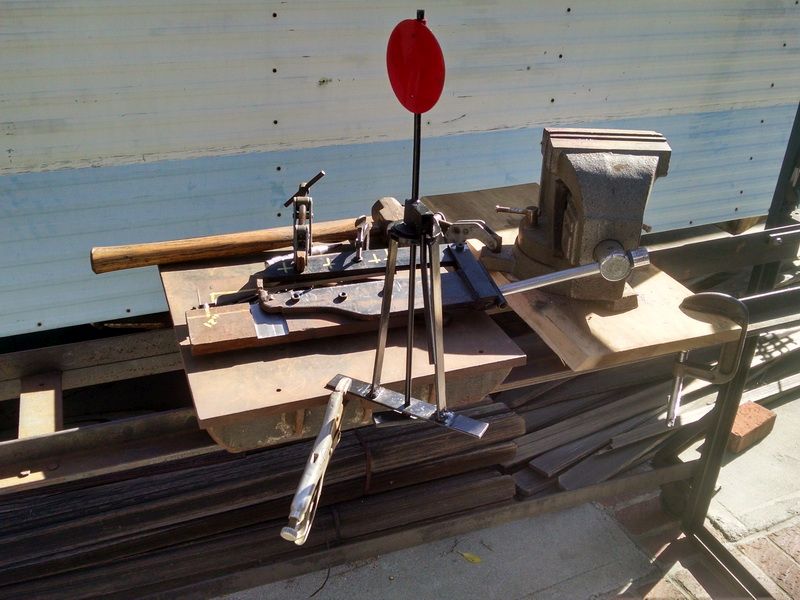
Gary Armitstead said:
Ric and Forrest,
These are the “tools of the trade” carried on most trains…Re-rail equipment such as this one (leverage tools and physics).
Cool, thanks! Had been wondering about how that job was done.
Brings to mind, "“Give me a place to stand and with a lever I will move the whole world,” attributed to Archimedes.
Have fantasied about what kind of appropriate power it would be fun to have. Mike has a little 4 wheel Plymouth-something in MoPac blue.
Things imagined for me are one of the Pennsy electrics; an interurban box motor; or some kind of funky little industrial critter.
Think I would prefer battery power over internal combustion; fewer fragrant fluids involved, although … hydraulic transmissions are interesting.
Forrest Scott Wood said:
Gary Armitstead said:
Ric and Forrest,
These are the “tools of the trade” carried on most trains…Re-rail equipment such as this one (leverage tools and physics).
Cool, thanks! Had been wondering about how that job was done.
Brings to mind, "“Give me a place to stand and with a lever I will move the whole world,” attributed to Archimedes.Have fantasied about what kind of appropriate power it would be fun to have. Mike has a little 4 wheel Plymouth-something in MoPac blue.
Things imagined for me are one of the Pennsy electrics; an interurban box motor; or some kind of funky little industrial critter.
Think I would prefer battery power over internal combustion; fewer fragrant fluids involved, although … hydraulic transmissions are interesting.Forrest,
You might want to take a look at two “build threads” on LSC of two locomotives I am building/have built The first is a smaller industrial critter, battery powered, 4-wheel. The second locomotive is a Baldwin/Westinghouse 60 Ton Freight motor. These were used here in So. Cal. by Pacific Electric mainly, but they were used throughout the country in the 20’ and 30’s. Again battery powered.
Gary Armitstead said:
You might want to take a look at two “build threads” on LSC of two locomotives I am building/have built The first is a smaller industrial critter, battery powered, 4-wheel. …
Ah, looking at the critter build thread it turns out that just over a year ago I asked “What kind of suspensions do these big things have?” (https://largescalecentral.com/externals/tinymce/plugins/emoticons/img/smiley-smile.gif)
Couldn’t have pulled that from memory without prompting.
Forrest Scott Wood said:
Gary Armitstead said:
You might want to take a look at two “build threads” on LSC of two locomotives I am building/have built The first is a smaller industrial critter, battery powered, 4-wheel. …
Ah, looking at the critter build thread it turns out that just over a year ago I asked “What kind of suspensions do these big things have?” (https://largescalecentral.com/externals/tinymce/plugins/emoticons/img/smiley-smile.gif)
Couldn’t have pulled that from memory without prompting.

Well the Big Brown Truck pulled up this evening with the last two components of my #5 “turnout build” :).
The cast aluminum #5 frog and the CNC milled/machined steel switch points. No excuses, have to finish it now. Maybe I can actually do some 1/8th scale “switch manuevers” this weekend.


Total length of the casting is 14 inches (for comparison). The aluminum tabs on the casting will be machined to fit the code 1000 West Coast rail profile and bolted in place. The closure rails will also have to be machined and drilled for the bolts/nuts, stainless steel 8/32 machine screws.

24 inch long steel points, CNC milled and drilled with machined tabs to attach the closure rails to the pivot points. The milled surface was “hard-faced” welded before cutting to decrease the “wear factor” on the points.

BOTH main stock rails will be milled for the point contact areas.
Close-up of the cast aluminum frog #5

Bottom of the aluminum frog casting. All holes for the attachment to the switch ties are already cast in place and elongated for expansion/contraction of the entire switch.
Busy days ahead with mill work and assembly.
Why is the frog stamped No 6 when you say its a number 5?
David Maynard said:
Why is the frog stamped No 6 when you say its a number 5?
Enlargement reveals it to be a 5 as 6s haven’t got a pair of square corners.

As Rooster would say " Shut up Maynard " (https://www.largescalecentral.com/externals/tinymce/plugins/emoticons/img/smiley-wink.gif)
What kind of throws do you use for those?
I don’t imagine it’s a tenmille…(https://www.largescalecentral.com/externals/tinymce/plugins/emoticons/img/smiley-wink.gif)
David Maynard said:
Why is the frog stamped No 6 when you say its a number 5?
Just for you…Also, you don’t “stamp” a casting :). The number is actually cast right into the casting. Cuts down on cost of manufacturing. This procedure is “standard” on higher end castings and it on all drop forgings and press forging parts in industry for aerospace and automotive. One thing it’s too labor intensive…the main reason is that the edges on a stamp if they are sharp (OR rounded over “specialty” stamps), will cause fracture lines to form in aluminum or steel (even high end alloy steels such as titanium and moly).

Ken Brunt said:
What kind of throws do you use for those?
I don’t imagine it’s a tenmille…(https://www.largescalecentral.com/externals/tinymce/plugins/emoticons/img/smiley-wink.gif)
Actually there are several options for this switch depending on where it is placed on the railroad and whether the ride-on engineer wants to step out of his train. The high-end option for most big clubs is to use a push button mounted on a length of vertical tube or pipe and the switch point is moved by a solenoid and small “motor” mechanism. A second option with this kit is a ground throw very similar to Tenmille, just much larger using a cast aluminum pillow block. A third option is a throw similar to a Banjo switch. You could also use a scale model switch stand similar to a SSVR brass switch stand. I am using the latter. A switch stand made by my buddy at Eaton Custom Engineering in Castle Rock, Washington. Rich Eaton owner. After looking at the new brochure and order form that came with my drop shipment yesterday, I notice they offer another “shorty” switch stand now. I might just use THIS one. It only stands about 10 inches tall with small cast metal arrows similar to ones used in 1:1 freight yards. Cost about $30, not much more than a SVRR brass switch stand :).
Sean McGillicuddy said:
As Rooster would say " Shut up Maynard " (https://www.largescalecentral.com/externals/tinymce/plugins/emoticons/img/smiley-wink.gif)
Ok. So my eyes deceived me. No need to be so Roosterish bout it. (https://largescalecentral.com/externals/tinymce/plugins/emoticons/img/smiley-wink.gif)
I’ve used the one that you “bop” on the way by and it throws the switch up at the Finger Lakes LS. I was just wondering how “technical” you were going to get running in your yard…(https://www.largescalecentral.com/externals/tinymce/plugins/emoticons/img/smiley-wink.gif)
I’ve spent that much on a brass Harp switch stand.
Ken Brunt said:
I’ve used the one that you “bop” on the way by and it throws the switch up at the Finger Lakes LS. I was just wondering how “technical” you were going to get running in your yard…(https://www.largescalecentral.com/externals/tinymce/plugins/emoticons/img/smiley-wink.gif)
I’ve spent that much on a brass Harp switch stand.
Ken,
The closest I’ll get to a “bop” switch is to ask one of the grandkids to throw the switch! Heck, that’s half the fun of doing this scale, Right?
Seriously, I NEVER thought I would add any switch to this little railroad. But now that Accutie has these nice “kits” available, I will definitely add another for a siding…maybe two to make a passing siding. I DO have more than one locomotive and I can see this might catch the grandkids attention. Funny, I went out to lunch yesterday with two old friends who also belong to LALS. One of them dropped me off and wanted to see what I was doing. When he saw the track, he let out a big laugh and said he had a 30 year old electric (a critter), never took it to the club to run (too embarrassed he said :)) and NOW he had a place to run! I can see a small meet in the future. A bunch of old guys playing with their toys!
Is he going to pay you for use of YOUR right of way? (https://largescalecentral.com/externals/tinymce/plugins/emoticons/img/smiley-wink.gif)
David Maynard said:
Is he going to pay you for use of YOUR right of way? (https://largescalecentral.com/externals/tinymce/plugins/emoticons/img/smiley-wink.gif)
Funny you should say this…when he picked me up for lunch yesterday he said he had almost purchased the house just up a couple of doors from us. We both commented then we could have either built a tunnel UNDER the street OR a BRIDGE over the street and combined both layouts! :).
Today I started to layout and machine the closure rails to fit the cast frog and machine the ends to the finish length. Set up the straight closure rail first on my little mill and machined one end only first.

Then turned the straight rail end for end to cut the finish length. This length is critical to the geometry of the entire finished turnout. This places the steel switch points and the frog in the proper position should that you maintain the track gauge on BOTH the straight section and the curved section. I setup up a miniature Starrett square head and blade clamped to one end finished. This is my base. Then I pulled my 36 inch precision blade out and pushed it against the small blade to establish the first 36.000 inches of the total finished length of the closure rail (length is given as 47.516 inches long.

Next I took a second full size Starrett square head and set that precision blade to 11.516 (36 inch blade + 11.516 for the total of 47.516). You really don’t newed to purchase huge dial calipers to measure long work like this. You use a small caliper and measure from the end of the set blade down to the surface of the square head and you can check that dimension down to as accurately as is the caliper. It’s like having a huge micrometer!


After I milled the rail to finish length, I setup to drill the pivot point hole for the steel switch points. I use an edge finder to drill the .257 diameter hole in the proper location in the rail. The tip on the edge finder is .200 in diameter. You dial the table over until you touch the workpiece with the .200 diameter end and as soon as the spindle of the edge finder goes off center (as shown in the photo) then you set the dial on the mill to .000 and dial another .100 and your spindle is dead on center to that edge of the work. Set the dial again to .000 and then dial to the dimension given for the location of the hole. In this case, the hole is .375 from the end of the rail.

Three more photos showing the completed straight closure rail with the steel switch point (straight side) attached and ready to install in the ties.


That’s about all I could get done today. Damn Santa Ana winds are blowing hard here now. Gust of 50-60 mph and temps in the eighties! Tools and prints are blowing away!
Ken Brunt said:
I’ve used the one that you “bop” on the way by and it throws the switch up at the Finger Lakes LS. I was just wondering how “technical” you were going to get running in your yard…(https://www.largescalecentral.com/externals/tinymce/plugins/emoticons/img/smiley-wink.gif)
I’ve spent that much on a brass Harp switch stand.
Ken,
Here is a scan of Accutie’s product line I received with this frog/switch point shipment. You can see the switch stands they offer and are very reasonable. You can buy LS “G” stuff for more than this!

I’m seriously thinking about adding the “Cammed Switch Throw” now, because I won’t have to do any “changes” to the geometry" of the throw that I WILL have to do with my custom switch stand from Eaton Engineering.
Made “some chips” today, but not many. Lots of “thinking” though on how to fit this large rail in a cramped shop machine area. Setup the 10 foot long curved stock rail first so I could mill the switch point notch and long taper for the sides of the points to hit the curved stock rail. It was pretty cramped because I had to clear the headstock of my 12X36 inch Atlas lathe! It was so close that I had to remove the hand crank from the compound. It worked with a half inch to spare. This will be about a 23 inch long cut so I setup the roller support to hold the far end.


Next rail I had to cut was the straight closure rail…the rail that has the switch points attached. There are a pair of tapers at the pivot point of the switch. To set the rail at the proper angle, I use a dial indicator (in this case a 0-1 inch travel) and then dial the table in “X” axis a set distance…trigonometry amount of travel to the offset.


I’m using a “sacrificial” board to cut these tapers…I don’t want to cut the mill table! Only the rail foot is cut.

.jpg)
Checking the print dimension…

To make my mill and lathe set-ups in my garage (cramped as it is :)), I have a “template file” of the layout of the two side by side machines. Also the measurements of the mill table and the T-slot locations. That way I have the setup already figured out and all I do is go in the shop and “physically do it”. This “screen shot” shows the setup for the curved stock rail on my computer and what the actual setup looked like. Because the mill table moves, I can move the table in relation to the cutter in the software and I know before I cut, that I have enough room to actually cut it. Saves a ton of work! AND BAD words :)!
