
Looking forward to the challenge again this year  I always enjoy watching what tricks you have up your sleeves for these builds I look forward to seeing your progress!
I’m looking forward to seeing what you and the rest cook up as well 
Miks Challenge 2015, Official Napkin Submission:


This is why I usually just built the thing and dont show any sketches
Need kit need kit need kit!!!
LOVE IT !!! Just the kind of wild and crazy thing that I was hopping to come out of this challenge.
Rumor has it that it will actually shoot smoke and Flames from the back. That will make it really cool…
Watch out Boomer… Vic’s coming after your Crown…
Sifting through the back of the junk heap I pulled out an old Pringles can that is about the right length for the rocket body (savings of $1.50). The battery xmas loco chassis has a clear plastic tube for a smoke generator (not sure where that’s going to end up) as well as three very bright lights I want to redirect to the rear rocket tubes. I am also planning to use as much of the scrapped bits from the battery loco as possible. Also begun reading up on how to cut cardstock into nose cones. Need to track down which car Wallace and Grommit are currently living on. So far the only expenditure was the $10 for the 50% off Xmas train set back on Dec 26, no projected new costs.
Introducing the brains behind this years challenge entry, I rehired my Crack Science Ninja team:

Wallace will be in charge of the engineering, Gromit is the fabrication specialist and crack problem troubleshooter. Wallace and Gromit have a long history with the Borracho Locomotive Works dating back to one of the very first BLW builds, the Silver Bullet from over a decade ago:

There was some consternation inside the ranks of the BLW as chief foreman Homer was very upset that he wasn’t assigned the job, but it was hard to argue that W&G have a much better track record with building rockets.

So Homer was instead told to go out and inspect the line to make sure the line was up to snuff. To assure he did this happily he was given as much pizza and donuts as he wanted and took off in one of the inspection gooses and hasn’t been seen since.

This should allow W&G to proceed unimpeded.
The Crack Science Ninja Team at work:
and by far the best thing is that I can pay them with cheese!

Woo Hoo!! Dave’s kit arrived today, thanks Dave for all your hard work putting the kits together and mailing them.

But I got a slight problem with the kit…
It’s wide, I mean W I D E, …the card/masonite piece alone is about 5/8" wider than the Lil Big Hauler cars, and much wider than the HLW cars I’m currently using on the pizza. Add the sides and it’s going to end up 3/4" to over an inch wider than anything else. The trouble is that clearances on the pizza tunnels are the often measured in small fractions of an inch, some stuff rubs anyways. Given one of the criteria is that this has to work on our layout and the pizza is my only current layout. Looks like I might have to put the kit on a slight diet to trim it a tad so it won’t get wedged in the tunnel

Vic, You have three options as I see it…
-
Cut it down.
-
Cut it down.
-
Use options either 1, or option 2, or both.
I have faith in you that you will choose the correct option for your needs.
Can we hurry this up!
My crack Science Ninja team has gotten bored, Wallace decided to experiment with a double barrelled cheese launcher that fires both Chedder and Wensleydale.
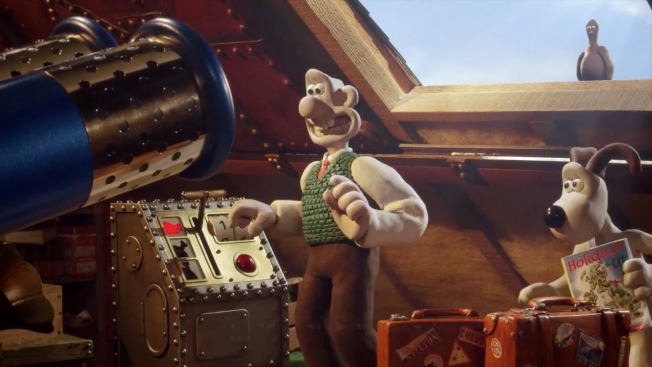
Unfortunatly he forgot that the US uses 120v not 240V
Now I have to get the lab roof fixed.
You launched the clerk?
Nope, Wallace’s little electrical error causes a high voltage arc inside the loading chamber triggering a flash vaporization of the Chedder resulting in a gas explosion, but the hole in the roof is the least of the problem, its the chedder all over the walls thats the real mess. I have since decided to leave the electricals to those who are experts in their trade:

Meanwhile Wallace has been promised a fully paid vacation if his endevour leads to fame and fortune

Vic Smith said:
The Crack Science Ninja Team at work:
and by far the best thing is that I can pay them with cheese!
Wow! That’s exactly how I pictured you working in your shop, Vic.
Vic Smith said:
Don’t think too hard, Vic. You might hurt yourself
OK gave my Crack Science Ninja Team the go ahead this AM, they started cutting as soon as they were up.

I will check their progress later tonight
Argh! progress is slow! My Science Ninja team does most of the work in the early AM before I go into work, the biggest problem using cardstock is gluing then waiting, even using CA as a spot weld is no guarantee. So the early stages are slooow. I also have to consider a few functional issues. the loco chassis has a very weak smoke generator that I hope to repurpose but that means finding a section of plastic hose to extend the outlet and my planned tailcone section is not working out the way I would hope. I planned to just reuse the Pringles lid to mount my rockets but the damn plastic is feckless, warps, and almost nothing adheres to it. So something will have to done about that. Also my endless box of parts came up short, or at least I cannot find the bag of flower pots I know I had and was going to use as rocket nozzles, if they dont turn up in the garage looks like I’ll have to make a trip to Micheals this weekend. Meanwhile my Science Ninja Team seams to be spending most of day eating cheese and crackers waiting for the Elmers to dry.

Taking pics as we go, hopefully post progress tonight
Dave I don’t think your going to be thrilled seeing how your kits is ending up, I’ve had to make a few minor slight tweeks…
OK pics uploaded, here we go, this gives you some idea of the donor chassis:

a whopping $10. Nothing is going to work if I can’t make some simple geometric shapes, so first up was shaping the nosecone, which is cardstock, then reinforced with a second layer of card inside:


I used an online geometry site to help get them right, the lower cone actually took 2 tries to get.

on to the main body, which I found sitting behind my workbench, this was going to be part of a tank farm but…

next up the chassis build up starts
Dave’s kit arrived and once I started looking at it almost immediately I realized I couldn’t use it in its original form, so remembering rule 1 …

My Crack Science Ninja team survey the cutting of the tube

test fitting, Wallace supervises

Debate on the fitting of the nosecone.

The attaching of the nose cone commences

My Crack Science ninja team also verify that their cockpits will be satisfactory, next work on the tailcone commences, we came up with the idea of a balsa baseplate using screws instead of trying to use glue.

Wiring and alot more work still to do. but that’s the work to date.
BTW had to make my first post start purchase, scale flower pots re: booster rockets $1.99