Thanks, Guys!!!
-Kevin.
Thanks, Guys!!!
-Kevin.
dieseldude said:
Thanks, Bob. I used some plastic canvas for the walkway grating. I found it at a local Hobby Lobby craft store. It came in wide or narrow spaced grids. The narrow spaced stuff looks more in scale. It's usually used for some kind of needle point or something (I'm not very craft savvy!). I spray painted it grey, but it kinda looks a bit white in the picture. I glued the canvas to a narrow strip of black plexi glass. The railings are made of wide spaced hardware cloth. I drilled some holes through the grating and the plexi, then poked it in.-Kevin.
You are my Hero of the month, nice build Sir…
Nick
Fine work, Kevin.
I would be interested in seeing some of the details of the gusset plates, etc. How did you fasten things together?
Good lookin’ bridge!
Steve
Steve- Thanks! I’ll try and post some close up/detail pictures when I get a chance. While the gusset plates themselves are probably around scale size, the fasteners are definitely not. I wanted to be sure that the fasteners would be strong enough to hold the span and inexpensive enough, not to break the budget. A real bridge would, of course been riveted together (I have no idea on how to make that happen!). I know that there are a few companies that sell scale size nuts, bolts, etc., but I needed a lot of fasteners… and cheap! So, I used the smallest sheet metal screws that Harbor Freight sells. The day I went to Harbor Freight, they had them on sale- 2 bucks for a pack of 550 assorted. For that price, I just might build another bridge some day!!! In the end, I don’t think that the sheet metal screws really look that bad. Especially, after the bridge was painted black. Hopefully, people look at the bridge in its entirety and not notice the out of scale screws.
-Kevin.
“Hey, Kevin, when you’re done, you’ve got to tell us what your total cost was. This is awesome! John Le Forestier, Toronto, Littleton & Smallville Railroad, “The Old Late and Slow”. “Simplicity is the greatest sophistication.” - Attributed to Leonardo da Vinci.” John- Here’s the final tally on the big bridge. -Aluminum screen framing material $3.00 x 8 pieces -Harbor Freight sheet metal screws $2.00 -Walmart black spray paint $1.00 x 5 cans -Old milk crate Free -Fiberglass material for top cross bracing salvaged from neighbors garden arbor -Misc. aluminum scraps scrap bin items -The satisfaction of finally replacing this 2x6 eye sore of a bridge:
(http://freightsheds.largescalecentral.com/users/dieseldude/_forumfiles/IMG_3406.JPG)
-with this bridge…
(http://freightsheds.largescalecentral.com/users/dieseldude/_forumfiles/IMG_3408.JPG)
…PRICELESS!!! -Kevin.
Excellent!
… you’ve got me grinning!
B-e-a-utiful
Wow, great job on that bridge! Really turned out nice!
Thanks, guys.
-Kevin.
Hi Kevin,
Nice work on the bridge. Can you say what you used to make the bottom besides the milk crate, looks like maybe 1/2 inch angel. Could you post what you used.
Thanks Chuck
Thanks, Chuck! I used 3/4 inch aluminum angle for the main bottom beam. I also used a piece of 1/2 inch aluminum bar below the 3/4 inch aluminum angle to sandwich the milk crate in. The thickness of the milk crate plastic was not very uniform, so the 1/2 inch bar helped hold everything even with the 3/4 inch angle. It also made the milk crate a lot stiffer for the trains. Hope this helps.
-Kevin.
Hi Kevin,
I’m planning to build two maybe three bridges. I like the looks of the pin connected truss bridge and plan to build that type of bridge using your methoid of construction. Thanks for the aditional information.
Chuck
No problem, Chuck. Glad to help. Show us some pictures of your progress when you get a chance.
-Kevin.
Not only could I not have built it, I coulda not even thought of it! Awfully clever to support the walkway material with clear plastic.
Nice work, d-d-d-dude.
jack
Is the gusset plates just some thin Aluminum? All the other above the bridge stuuf is the screen material? What a cool idea. How is it holding up in the 4.5 years since it was built? Any things you would have done different? Definitely not a rivet counter so the screw size means nothing to me, I just like the look of it. Going to raid the mini mart for some milk crates to stock up. Thanks, to whomever pulled this back up.
Really nice. Good looks with a cheap budget is a great combination. I haven’t used Milk Crate for anything but storage, but how does it hold up to UV from the sun? Most plastic doesn’t last too well.
looks like it has been painted so may have better UV protection, Hope Diesel Dude/Kevin sees this and updates us on how it has lasted
Thanks guys!
Pete- Yes the gusset plates are just some thin gauge aluminum flashing material. In order to cut them quicker and more uniformly, I used an old tool I picked up years ago. At the time, I had no idea what I’d use the tool for. Now I do. It’s a g gauge bridge gusset cutting tool…
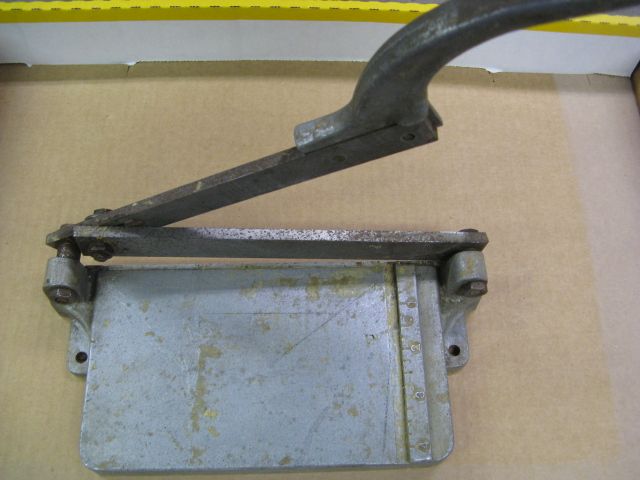
Okay, maybe not. In reality, I believe it was used for cutting the old, once popular, plastic bathroom and/or kitchen wall tile. Way back in the 40’s and 50’s. The bottom of the tool says, “Plasticutter.” It also has some dried glue residue on it. The measuring scale only goes to 4 inches, which was the size of the tiles back in the day. This tool was perfect for cutting so many gusset plates. It has a hinged fulcrum and a serious blade for cutting the aluminum (or anything else). They don’t make 'em like they used to! It definitely made the job go quicker.
As for the "screen material’ you are refering to- it is actually plastic canvas. The type that people use for needle point or something. I only used it for the walkways. Here’s a shot of it…
It looks white in the picture, but was actually painted grey. Initially, it looked great and lasted for a few seasons. However, the sun finally won and the plastic canvas material started to disintegrate. I wonder if a heavier coat of paint would have helped it? Or maybe a different brand of paint. This is the only thing that didn’t last on the bridge.
After nearly 5 years, the bridge still looks great (except for the plastic canvas). I did remove the bridge for one season while I revamped the entire layout. While it was off the layout last year, I did touch up the paint before reinstalling it.
Let me know if you need any more info.
-Kevin.
