Large Scale Central

3D Printed Trucks

Eric Reuter said:

I have been using ProPLA, made by 3D-Fuel. It can withstand high temps, and you can anneal it in the oven for even higher temperature tolerance. It is very easy to work with, and I have no trouble printing at the highest resolution my printer can handle (0.05 mm). It’s much more expensive than regular PLA, but I’ve found it to be much easier to deal with than PTEG or ABS.

I was given a spool of 3D fuels pro high heat PLA as well as some beer-infused PLA. Been meaning to try them. To add to this thread, I’ve been experimenting with PLA, ABS and TPU outdoors for a few years now and will offer 2 bits of advice. Paint and 40% or greater infill will help combat the effects of UV and heat. Overall, I would not recommend PLA for parts directly exposed to the sun. But heck, if your trucks warp, you can always print another set for 25 cents!

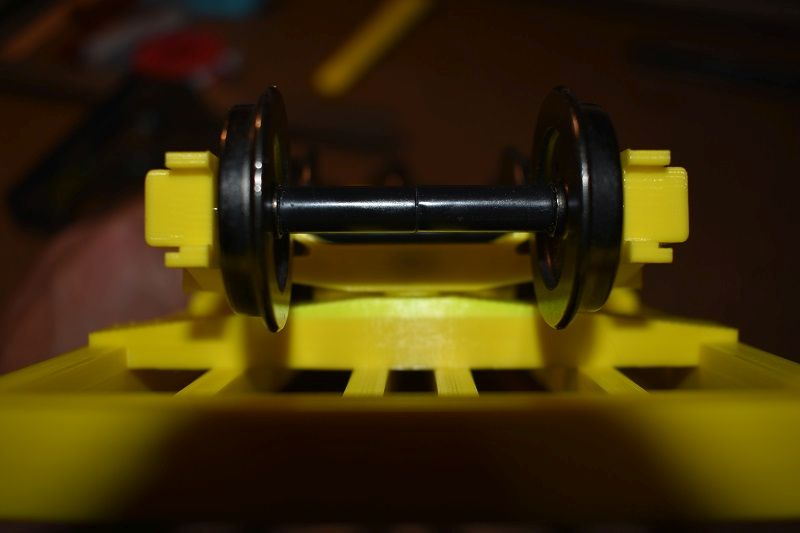
Al, PETG’s properties are similar to ABS but it is much easier to print with because it has much better adhesion to the print bed, too much sometime. The drawback is it is stringy and small details don’t look very good. But, it can handle higher temps. I’m not sure what my plan is right now with the trucks. It started out as a challenge to myself to simply replicate a set of archbar trucks but now that I’ve printed a set, I see a lot of flexibility by printing my own, both with the trucks and the bolsters and also the connections to the car. I may be interested in casting once I get a final product, but I’m not there yet. I will certainly get in touch if I decide to go down that road. Thanks for the offer to help, cause I wouldn’t know where to start.

Sean, I think John hit the nail on the head (http://www.largescalecentral.com/externals/tinymce/plugins/emoticons/img/smiley-surprised.gif). I am dreading fooling with the insulation. And I do like the engineering as much or more than I do the building. That is probably why I haven’t started on the layout. I can’t get past the engineering, but that is ok too cause I’m having fun.

John, you would be correct … see above.

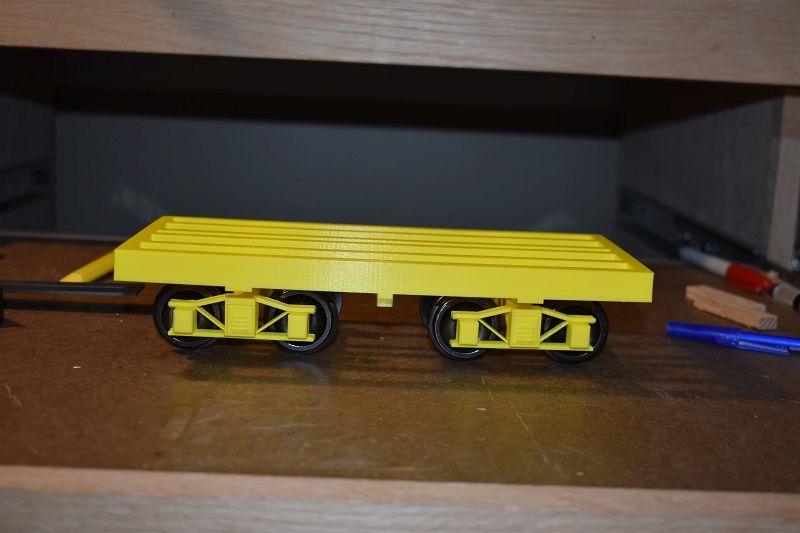
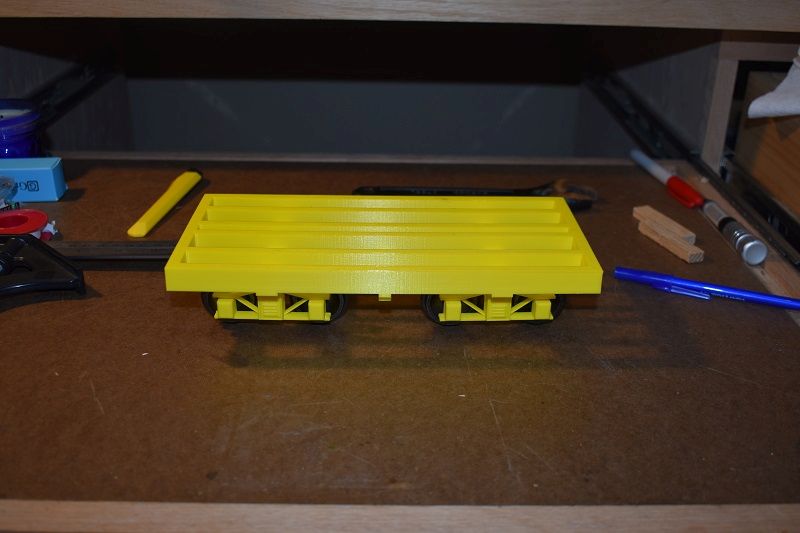
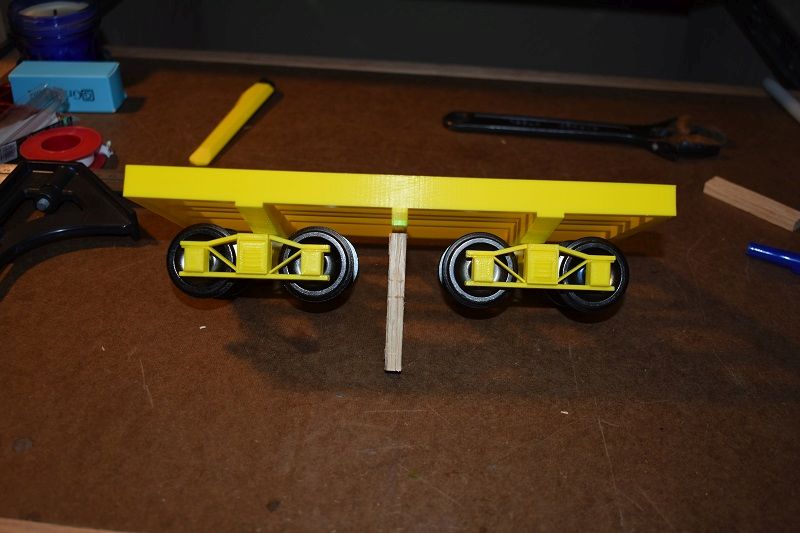
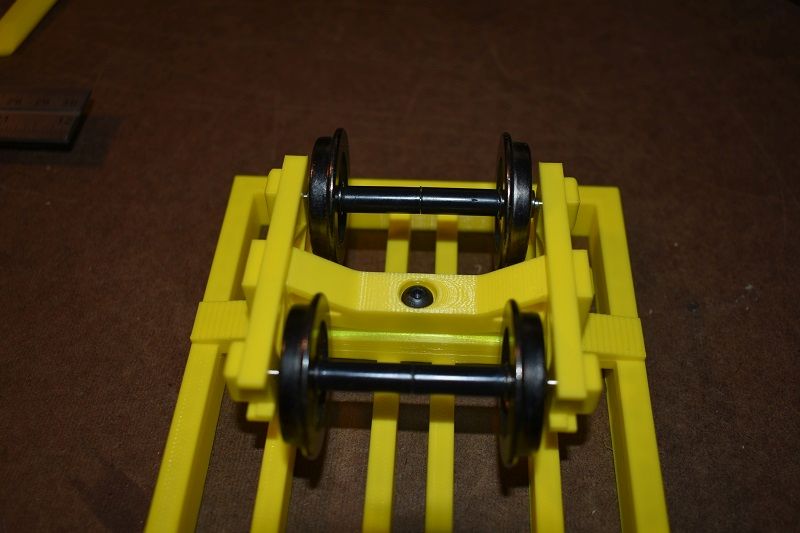
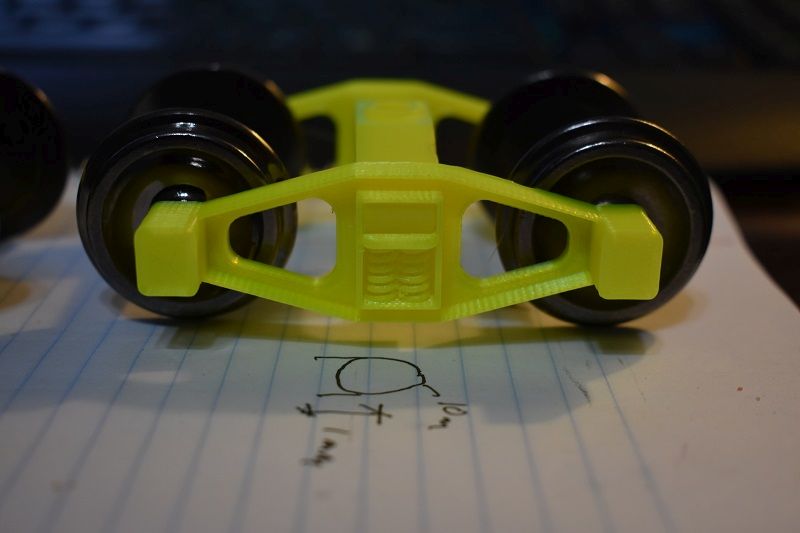
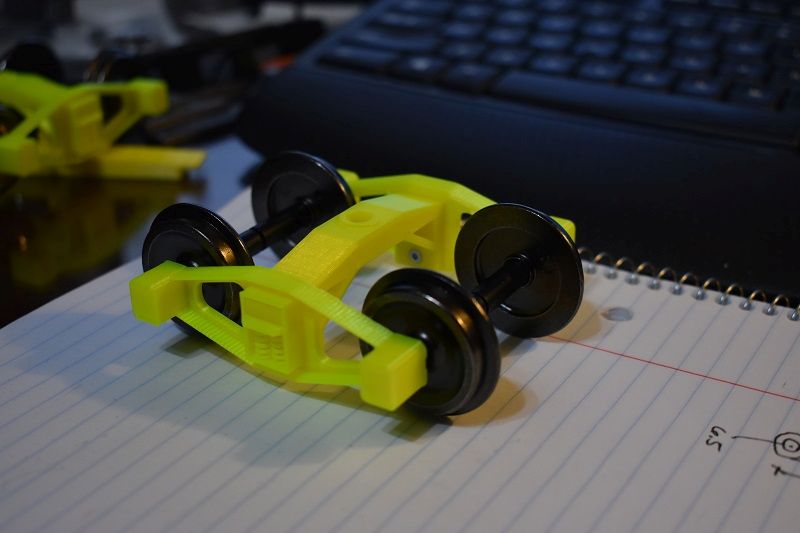
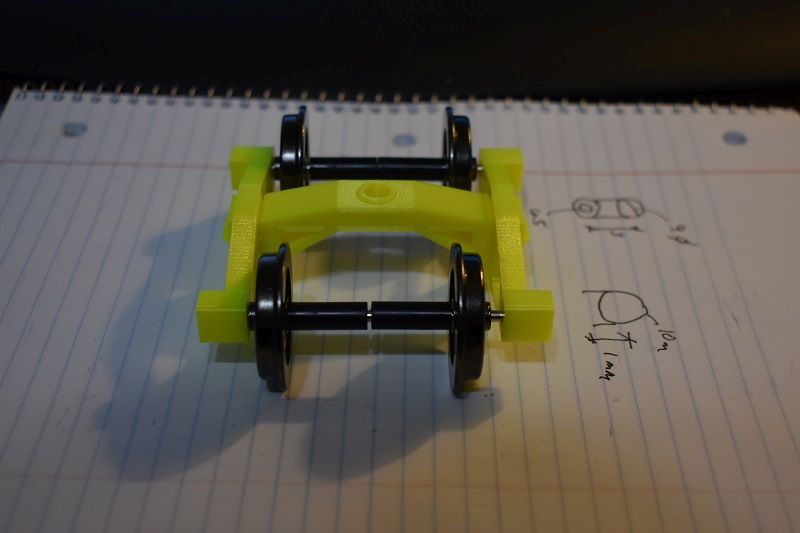
Joe, I believe the PLA will work just fine and even if it fails for whatever reason that’s ok. We have repair shops on the layout for a reason and we can either print another set or just have spares available. I have solved the equalization issue with my latest bolster and connection design. It gives 5-8mm of movement. I am using a Prusa printer. I originally bought the MK2s and have recently upgraded it to the MK2.5. I have no issues with it. I find it easy to keep tuned and get quality prints. I do wish it was bigger. I’ll be glad to share the stl files with you. I am currently away from home … I’m actually in Florida this evening and tomorrow attending the Duke vs FSU basketball game . … I’ll touch base when I return home and shoot the files to you. I would welcome any feedback.

Eric, I have some ProPLA filament from a different manufacturer but I have not used it yet. Well, check that … now that I think about it, what I have may be PLAPro. Not sure. I’ll look at it when I get home. I’ll have to try it out and see how I like it. I’ve never tried annealing but I may have to give that a go too. What printer are you using?

Dan Gilchrist said:

Eric Reuter said:

I have been using ProPLA, made by 3D-Fuel. It can withstand high temps, and you can anneal it in the oven for even higher temperature tolerance. It is very easy to work with, and I have no trouble printing at the highest resolution my printer can handle (0.05 mm). It’s much more expensive than regular PLA, but I’ve found it to be much easier to deal with than PTEG or ABS.

I was given a spool of 3D fuels pro high heat PLA as well as some beer-infused PLA. Been meaning to try them. To add to this thread, I’ve been experimenting with PLA, ABS and TPU outdoors for a few years now and will offer 2 bits of advice. Paint and 40% or greater infill will help combat the effects of UV and heat. Overall, I would not recommend PLA for parts directly exposed to the sun. But heck, if your trucks warp, you can always print another set for 25 cents!

Dan, thanks for your insight. And yes, printing the trucks is easy and cheap and we can keep the boys in the repair shop busy too. What has been your experience with TPU used outdoors? I’ve used it for a few items in the house and like it but no exposure to the elements yet.

Dan, thanks for your insight. And yes, printing the trucks is easy and cheap and we can keep the boys in the repair shop busy too. What has been your experience with TPU used outdoors? I’ve used it for a few items in the house and like it but no exposure to the elements yet.

Well, my longest test would be the TPU would be the Lug nut covers I made. https://www.thingiverse.com/thing:2263166 After a year of exposure to New England weather, the top 2 layers (.4mm) were dry enough to rub off with my thumb. I wanted the test to go until failure but a week later, when the sequoia went in for a new frame I told the dealer not to worry about damaging them and they threw them away! I reprinted them, but this time I hit them with 2 coats of wheel paint. It’s been about 8 months now and they show virtually no signs of wear. I have used TPU in other areas on the farm and like PLA, when exposed to direct sunlight, unprotected it tends to dry out, crumble and break. Applications when there is little/no exposure, like washers for the goat kid feeding bucket hold up very well.

Dan Hilyer said:

Eric, I have some ProPLA filament from a different manufacturer but I have not used it yet. Well, check that … now that I think about it, what I have may be PLAPro. Not sure. I’ll look at it when I get home. I’ll have to try it out and see how I like it. I’ve never tried annealing but I may have to give that a go too. What printer are you using?

I have a Prusa i3 Mk2.5 (2 upgraded to 2.5).

Anybody have any experience with UV and or exposure to the elements with 3D printed components of SLA or resin printers?

Michael

Michael,

As with other items susceptible to UV exposure a coat of paint goes a long way. the Form 2 system uses UV light to do a final cure / hardening process so I would not make it a major concern.

Al P.

I understand the photopolymer resins harden by exposure to UV light and thus parts will continue to cure by additional exposure to UV and eventually crack. I spoke to a formlabs rep at a trade show and he said that none of the resins they sell are intended for outdoor exposure. He suggested casting in another material. This is one of the reasons I have no yet purchased an SLA printer.

https://www.3dhubs.com/knowledge-base/sla-3d-printing-materials-compared#overview

Here is a complete pair of trucks attached to a little short flatcar frame I printed. The car is about 15 scale feet in 1:20.3.

Here is the connection between the trucks and the bolster on the car. I used a m4 screw. I designed some play into the connection to allow for the equalization of the trucks.

In the next couple pictures you can see how much the frame can move on either side before hitting the truck bolster.

I’m still going to add some detail to these trucks but I wanted to get the mechanics worked out first. I have a set of Bettendorf T trucks on the printer. I’ll have those for you tomorrow. I think Andrews trucks are next on the list. Thanks for all the input into this project.

With the trucks the usual method is 3 point suspension; one truck snug so that it only turns and the other loose enough to rock. The loose truck provides 1 point (suspension) and the snug truck 2 by transferring the weight bearing to the sideframes. The cars should track, but not rock, unless you’re modeling the Rock Island and then you might want more rocking…

John Caughey said:

With the trucks the usual method is 3 point suspension; one truck snug so that it only turns and the other loose enough to rock. The loose truck provides 1 point (suspension) and the snug truck 2 by transferring the weight bearing to the sideframes. The cars should track, but not rock, unless you’re modeling the Rock Island and then you might want more rocking…

Or the Penn Central, and then the cars should rock back and forth in an alternating motion. (https://largescalecentral.com/externals/tinymce/plugins/emoticons/img/smiley-wink.gif)

John Caughey said:

With the trucks the usual method is 3 point suspension; one truck snug so that it only turns and the other loose enough to rock. The loose truck provides 1 point (suspension) and the snug truck 2 by transferring the weight bearing to the sideframes. The cars should track, but not rock, unless you’re modeling the Rock Island and then you might want more rocking…

I’m not a fan of snugging one truck. It does stop the freight car body from rocking, but if there’s a dip or a hump in the track, then the loose truck follows it but only one axle of the snug truck can follow the rails.

Both trucks need to be able to rock back and forth, and one needs to rock from side to side. If you want to stop the body rocking, then a pair of blocks above the bolster on one truck will help.

I guess we lay our track to different standards, but I’ve never seen the loose truck prevent the other from tracking. Can’t say I studied that hard either. Let’s say I’ve never noticed that.(https://www.largescalecentral.com/externals/tinymce/plugins/emoticons/img/smiley-wink.gif)

Pete is more experienced, so your mileage may vary.

We now interrupt to track standards tangent to comment on truck designs: after some future paint where they can be produced, I’d be interesting in acquiring a couple pair of the Fox pressed steel trucks for something yet to be designed for my quirky little freelance traction line.

(edit: I mean point, not paint, but my brain’s word mistake does bring up the question of what in the way of spray paint would be good for painting the parts)

Forrest, you’re in luck. Those are on the drawing board so to speak. I’m going to do the Alexander trucks next, but I’ve started making hand sketches with dimensions of the Fox pressed trucks.

I took the Bettendorf T trucks off the printer this morning. Other than adjusting the depth of the hole for the screw that secures the bolster to the side frames and maybe a detail or two, I think those are done. I’ll post pictures tonight.

Pete Thornton said:

John Caughey said:

With the trucks the usual method is 3 point suspension; one truck snug so that it only turns and the other loose enough to rock. The loose truck provides 1 point (suspension) and the snug truck 2 by transferring the weight bearing to the sideframes. The cars should track, but not rock, unless you’re modeling the Rock Island and then you might want more rocking…

I’m not a fan of snugging one truck. It does stop the freight car body from rocking, but if there’s a dip or a hump in the track, then the loose truck follows it but only one axle of the snug truck can follow the rails.

Both trucks need to be able to rock back and forth, and one needs to rock from side to side. If you want to stop the body rocking, then a pair of blocks above the bolster on one truck will help.

That’s what equalization will give you. The ability for the truck to rock, well actually flex, fore and aft. That keeps all 4 wheels in contact with the rail on the truck that doesn’t rock side to side. But most of our model trucks don’t flex that way during operations, because the trucks are too rigid, and if the trucks are sprung, the cars aren’t heavy enough to partially compress the springs to cause the trucks to equalize (flex).

Here is the Bettendorf T trucks. I was able to better simulate the springs. I’m not happy with the bolster design but it works. Its design to allow the bolster to be fastened to the side frame with a horizontal screw attached from the inside of the truck. I was able to attach the archbar bolster from the top, but because of the T frame you can’t do that with these without impacting the overall look of the truck. I’m still playing with other bolster designs.

Ok, I got to get my a$$ to working on my challenge build. Thanks for following along.

Sean McGillicuddy said:

OK now we know … why the oven isn’t finished …it’s held up in design …

Sean thank you. I now have my response to the ever present badgering I get here for Devoning a project to death, from now on it is forever being held up in design.

That would be the one.

I have seen those on a lot of older equipment. It would be nice to have these as a option in our gauge.

Devon Sinsley said:

Sean McGillicuddy said:

OK now we know … why the oven isn’t finished …it’s held up in design …

Sean thank you. I now have my response to the ever present badgering I get here for Devoning a project to death, from now on it is forever being held up in design.

Devon @ this point … and your current issues … you get a pass … for now…