Getting a straight car on a curved track to match up with a curved loading dock or platform is a pain. I re-cut the Middleton passenger platform like ten times before getting a ‘barely acceptable’ result. (That was before the big do-over, which let me work some straights onto the passenger siding - but now, I have to rebuild the platform)
Tim,
That was my thought. I think I can more profitable use that space for an outbuilding, bric-a-brac, or simply “margin of error!”
Eric
That might be the best course - a short dock that butts up against the track, with rounded sections to either side. Those section wouldn’t be part of the loading dock, rather, they’d be used to funnel material into/out of the plants interior. (Which would mean a lot of guys working very fast on a small loading dock.)
Update:
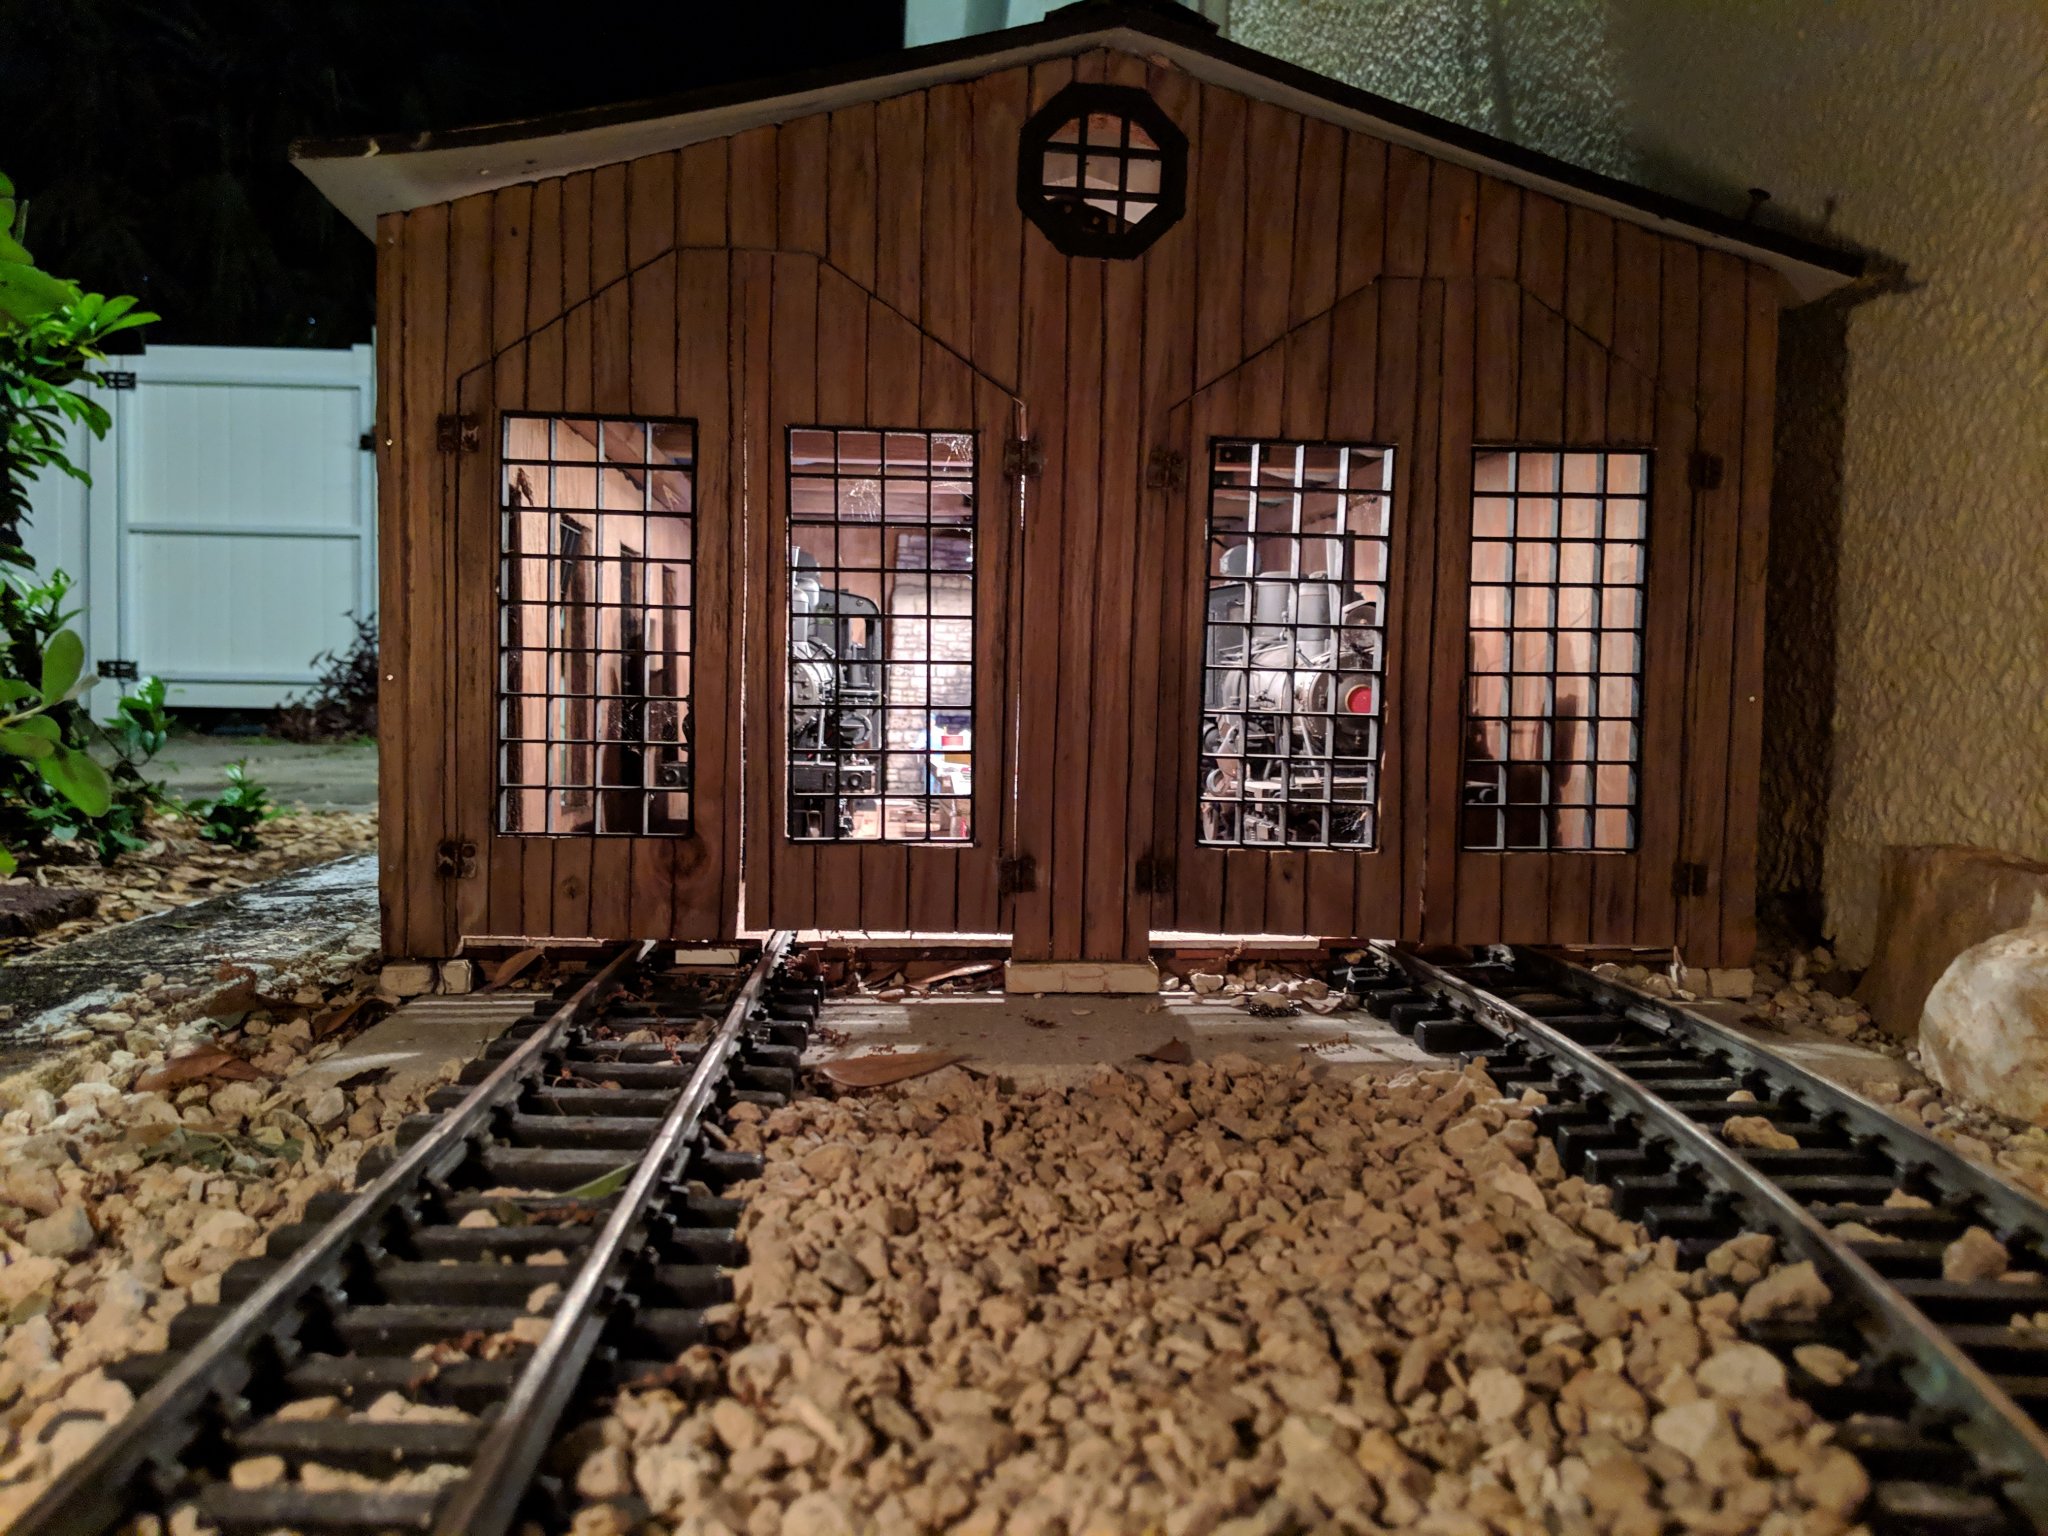
My chief concern as we move from making the core to making a mill is fit. If locomotives catch in the loader shed, it won’t work. If box cars (actually box car; we only have one…for now!) catch on the loading dock, it won’t work. I decided to schlep the whole assembly out to its ultimate location to do a test fit. First, some glamor shots:
I learned from a brief foray into musical theater at some point you just have to run the show to see how much work the cast and crew have accomplished. This served the same purpose. I can “see” the finished mill, now.
Back to the fitting…I had considered actually taking apart the tracks, slipping them into the structure, and running trains back and forth. That seemed like a lot of work. Instead, I laid the whole assemble over the existing tracks, then reached into the box-o-tracks for extras. I figured by making sure these staid aligned with the rails beneath, I could get a good fit:
Next up was a whole lot of trial and error. The limiting factors is Komaka Iki’s width relative to the shed portals. That ultimately drives the distance between the outermost wall and the track where I staged the box car. After some jiggling, I think I got it:
The loading dock will align the 12" straight track, per Tim’s suggestion. I can use the empty space for ramps leading to ground level.
With everything in place, I traced the tracks, marked center lines, marked off the dock area, etc. I am feeling confident enough now to order my “corrugated metal” from the hobby shop. In the meantime, I can cut the dock, make a simulated unloader area in the shed, and get some weather proof sealer for the joints. I am hemming and hawing about a plan to make a cut-out inside the shed to imply the conveyor system. I am also kicking around whether or not to make the roof removeable. The fact I cannot foresee a reason to remove the roof indicates I should probably be able to remove it. The 2x4 braces in the corner may offer an anchor point to screw in the roof. Likewise, I am debating windows and doors. I’ve no desire to do the interior, but it will look too plain without some large windows to let in outside light. I’ve also no real desire to pay for commercial products, and I am not sure how I would integrate them into the corrugated sides of the building. I’ve got time to figure this out!
Updates as progress dictates!
Eric
Update:
Roofing material on hand…(http://largescalecentral.com/externals/tinymce/plugins/emoticons/img/smiley-innocent.gif) I also added some foam strips to the shed’s interior to give that impression that can cars pass over something. I think I will plank that whole areas to improve that illusion. I am still on the fence in terms of cutting out the hole where the conveyor would take the grain into the mill. From a more practical standpoint I am wondering what glue would I use to affix styrene to foam? I think the structure is to big to cover the foam in latex before gluing on the siding. The remains of an old mill a ways over was at least partly stone, and I am wondering if we might be better off trying to emulate that, covering the foam in stucco then carving in rocks as it sets. Each step brings more questions.
Updates as progress dictates!
Eric
Update:
The diversion of funds to automotive repair necessitated a rethink of material. I present for your consideration one hundred 12 oz. cans cut open and soaking preparatory to conversion into corrugated metal:
The beaches are shut for COVID-19, the parking lots of the dive sites are closed, so might as well enjoy the catharsis of a mundane, repetitive task. Rather than bash these flat, we are going to anneal them in the oven this time. The plan is to do it in batches when we get to this point.
All materials are on hand now other than some stucco for the concrete foundation and styrene or plexiglass to scribe for the loading dock. It’s time to really start considering doors and windows and to weigh the level of detail in the interior of the loader shed.
Hope you are all having a great weekend!
Eric
Today’s Tip: thin sheets of metal have sharp edges. Have appropriate medical equipment (band aids, peroxide) on hand.
Tim,
Thanks! I escaped unscathed! More importantly, Kid-zilla, who found the shredded cans immensely cool, avoided any cuts, too!
The immediate question I have, though, is how to stick this to the glue? If I paint the foam with latex, then i am gluing the siding to paint, which is suboptimal. We did this for our bakery, but that was largely a horizontal surface. Tacking the sheets in place could work, but, given this if foam, I imagine it would work itself free over time. I have some scrap from the bakery project I may glue to foam using TiteBond III and see what happens. I have a professional obligation - COVID permitting - that will preclude real progress, anyway.
Have a great week!
Eric
Update:
This week i am time constrained, but I do have an opportunity to tinker with the glue issue. Yesterday, I used TiteBond III , smearing it on a piece of foam and mounting it vertically. Then I applied a scrap of aluminum and let it sit. Success! The next test used and actually crimped piece of aluminum. I smeared the glue over the foam as before and walked away. The crimping, of course, meant that there was less surface contact. It actually formed channels that set excess glue running down onto the aluminum at the bottom. More tinkering ahead…
Eric
Glue Test #2.
I applied a line of glue at the top of test piece of siding under assumption it would channelize slightly and run down the piece sufficiently to make a firm bond. Since I intend to let the siding overlap, I can always put a drop of CA glue on the bottom to hold it fast to the panel beneath it.
I am still mulling over windows. The mills ran 24 hours, so they should have lighting. I doubt, though, the mills had glass over the real things. Still, I am thinking of using plastic “glass,” rough it up with sandpaper, and running a micro-LED or two behind it just for the effect. Of course, that means I still have to figure out how to make the roof removeable…
Eric
Eric Mueller said:
Glue Test #2.
I applied a line of glue at the top of test piece of siding under assumption it would channelize slightly and run down the piece sufficiently to make a firm bond. Since I intend to let the siding overlap, I can always put a drop of CA glue on the bottom to hold it fast to the panel beneath it.
I am still mulling over windows. The mills ran 24 hours, so they should have lighting. I doubt, though, the mills had glass over the real things. Still, I am thinking of using plastic “glass,” rough it up with sandpaper, and running a micro-LED or two behind it just for the effect. Of course, that means I still have to figure out how to make the roof removeable…
Eric
Eric,
Might I suggest silicone roof and gutter sealer for attaching the metal to the foam. I used it outside in the Australian sun to glue some track base and it lasted over 10 years and was still good when I pulled up the track.
It will “sqish” into the corrugations.
Australian mills did not have windows in the receiving areas, actually a lot did not even have walls they were open to the air mostly because of the dust and noise, plus if a bin derailed it could be removed easier (crane coming in from the side to lift it out of the way, the mill had to be fed at all times).
If the windows are not really to be see-through, you could glue wax paper behind the windows. That’s easy and not really transparent.
Eric, have a friend in Sarasota that built an engine house and used panels for drop ceiling lights that are small squares gives it a very industrial look (https://gscalecentral.s3.amazonaws.com/2019/03/120182_a513475f461923b0cf7a630f3051c003.jpg)

Gents,
Thanks for all the tips. I did a little web research, and our mills had glass. I found examples with and without windows, and, yes, a small one made of stone. That would’ve been MUCH easier to model in foam! It was a lot smaller, too! The cane receiving areas were frequently covered. Mine is enclosed due to material selection and, frankly, skill. I’m scheduled to make a hardware store run this week. Hopefully, I can make some actual progress shortly.
Eric
Many moons ago I suggested that if one wanted to have dirty windows, rub some shoe polish on them
The response I got was: “What’s shoe polish?”!
Lou,
Cleary the individual did not spend time in one of Uncle Sam’s “finishing schools!”
Eric
Glue Test #3:
On a lark, I tried contact cement. It’ll bind the aluminum to remnants of the foam wonderfully! Thought I’d try… GAP, do you have a brand name for the adhesive you suggested? My three hour tour of hardware stores netted all the rest of the material I need to proceed, to include the eggcrate (great idea, Bill).
I am still working the roof issue. To light the interior I need access. To gain access, I need to hinge it, which will leave it open, in part to seepage from rain and inspections mo’o (lizards_. Those little guys crawl into everything!
Updates as required.
Eric
suppose the roof were not hinged, but form-fitted drop-on/lift off…
Tim,
Genius. I can fix the smokestack to the baseboard, lower the roof on it, and use make foam block forms to align it. Maybe I’ll make a boiler house adjacent to the main structure for the stack, simplifying this even more.
Thanks again!
Eric
Eric Mueller said:
Glue Test #3:
On a lark, I tried contact cement. It’ll bind the aluminum to remnants of the foam wonderfully! Thought I’d try… GAP, do you have a brand name for the adhesive you suggested? My three hour tour of hardware stores netted all the rest of the material I need to proceed, to include the eggcrate (great idea, Bill).
I am still working the roof issue. To light the interior I need access. To gain access, I need to hinge it, which will leave it open, in part to seepage from rain and inspections mo’o (lizards_. Those little guys crawl into everything!
Updates as required.
Eric
Eric
What I use is a roof and gutter sealant silicone made in Australia by “Sellleys” available from our “Home Depot” equivalent https://www.bunnings.com.au/selleys-300g-roof-and-gutter-silicone-waterproof-sealant-clear_p1230090
Amazon have an equivalent in the US made by DAP the top one is also paintable https://www.amazon.com/slp/gutter-sealant/8t9wbywx2xou9k6
I figure that if it is designed to be out in the weather on a roof then it should be fine on a model building.
As for the lizards I have them as well and I love them they eat all the bugs that chew buildings just think of them as free pest controllers.