My wife & I just discussed the whole thing, and she’s ok if the interior is painted to match the walls. So, here’s the result.
[edited on 2/25 to re-insert the pic]
My wife & I just discussed the whole thing, and she’s ok if the interior is painted to match the walls. So, here’s the result.
[edited on 2/25 to re-insert the pic]
Looks good. But I would think that the exhaust vent should go up upwards to above the roof line with a rain deflector on top for better diffusion into the ambient air. As shown, you could create a ground level toxic “hot spot” that your pets may not appreciate.
Yes, I agree that venting upward may be a good idea, but how much of a “toxic hot spot” are we really talking about here? Its not like he is going to be cutting PVC plastic for 10 hours at a time.
Thanks Todd, and good thought. The exhaust would be pulled by the fan outside, and then ejected from the fan. I’m planning an enclosure for that enclosure, and it’s outlets will be fairly simple, at this stage. And there will be more than one outlet from the box. And, as David said (thanks David), I won’t be using this constantly.
That said, you raise a good point. I’ll have to keep that in mind as I design the fan box and test things out.
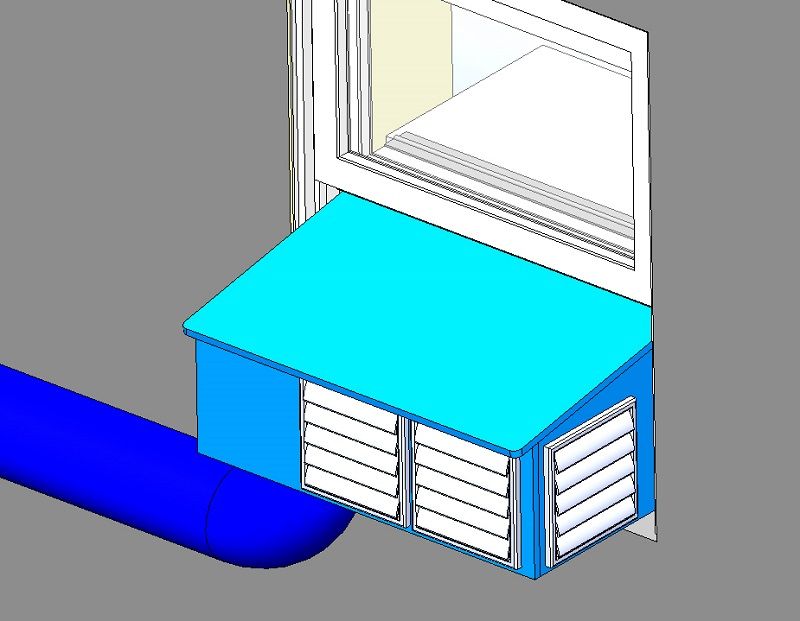
For the fan box, here’s my current thinking.
The centrifugal fan is stated to pull 636 cfm, at 110v / 5A. That seems like a lot of power / flow… Anyway, as Dennis mentioned earlier, I’m planning on putting the box outside. Here’s the enclosure I’m planning on at the moment. I like the Suncast products, very sturdy and dry.
https://www.amazon.com/gp/product/B003G4BBAU
The fan would have to be placed at an angle to fit, but otherwise it would mount normally on a base board. The exhaust line would penetrate the box, and hose-band to the center of the fan. For exhausting the box, these hinge-flap louvers work fine for our dryer, so 4 of them (a guess) might suffice here.
https://www.amazon.com/gp/product/B000VZK4G4
Which made me think about the inlet for makeup air. I think 3 or 4 of these on the window-box sides would be much better than the bottom screen, which seems too near the ground.
https://www.amazon.com/gp/product/B002FB65G0
[edit] Those inlet louvers are looking much better. Three will fit on the box.
Cliff
[edited 2/24 to re-insert the pic]
The next fly in the ointment will probably be power to the fan.
I’d like a direct power line to the fan box interior, but I can’t imagine a code-compliant path to make it permanent. I can run a UF 12/2 line to a weatherproof receptacle box in the vicinity, and mount it to the house wall. But not inside the fan box. I’ll have to settle on the fan’s cord temporarily connected to that new receptacle, only while running. Otherwise it needs to stay unplugged and somehow stowed. Maybe a notch at the top of the box, with a rubber liner, could pass the fan cord out of the box, yet allow it to be tossed back in when not needed. Electrically like a very elaborate electric leaf blower, and unplugged when not in use. That’s the best I can think up.
However, that receptacle box could/should be switchable from the inside. That would complicate the routing quite a bit. Huh. The plot thickens. But, maybe I could use an X-10 appliance module… but through 8" of concrete? Probably not. Still thinking things through.
Cliff,
Just remember that every elbow in the system reduces the velocity and pressure that the fan can produce
For instance if you have 10 elbows between the inlet and fan exhaust your fan may only be producing 300 cfm at discharge.
They tell you the size of the fan but do they tell you the requirements of the machine for air flow?
I’m sure the manufacturer has allowed for a variety of install ideas(http://www.largescalecentral.com/externals/tinymce/plugins/emoticons/img/smiley-laughing.gif)
Just sayin the fewer elbows the better.
Rick
.
Thanks Rick. Both the hose and fan come with the cutter, and I’ll be using them. The supplied information is scanty.
The flex hose will lay however it wants to indoors (in spite of my model of it, haha!). For reducing bends in the window box, I’d rather not have the exhaust hose come out the side of the exterior part, that would be asking for leakage. So I’ll leave the line as it stands, but thanks.
Cliff,
Does the fan already have a cord and plug attached to it? You can get a cord grommet and drill a hole in the fan box to pass the cord out in a moderately weatherproof fashion. I’ve done that to get power into the shed in my yard. As far as “temporary” power, if you buy a Taymac you can put a weatherproof box with a receptacle near the fan and just leave it plugged in all the time. Again, that’s how my shed is powered (albeit with an extension cord between the receptacle and the shed)
Personally, I think you’d want the fan switchable right at the machine, which could be most easily done with X10. I think it would work through 8" of concrete… and since you already have a wireless unit, you could test it. Alternately, don’t use a wireless module, go with a hardwired appliance module and a switch module so you don’t have to worry about steel in the concrete.
My unit came with essentially dryer exhaust duct, which is floppy as all get out. That works for me, because it’s near the door which I just open and throw the duct through. You might want some sort of system for hanging it so it doesn’t get too twisty.
Dan
Dan,
The fan has a cord, but it’s too small for 5A i think. Maybe #16. And it has a euro plug on it. So I’ll replace the cord w/ most of a new #14-3 or #12-3 extension cord.
I hadn’t noticed the term “Taymac” before, so had to look it up (at Home Depot). Yeah, those are great, allowing you to keep the plug in. I have a spare one, so just need a GFCI and WP box near the fan area, like you say. The wiring for this would be a semi-pain, so I might as well go all out and install a wall box and switch on the inside, near the cutter as you describe.
The duct they supplied is indeed like dryer duct, but tougher / thicker vinyl. Not sure how well it holds up outdoors all the time, but I agree, it’s best to secure it – in my case probably right to the outside wall with some straps of some kind.
Sounds like you have a similar system?
[edit] Here’s a summary of where this is heading. I have an indoor outlet near the cutter, on a 20A circuit that is very little used. I should be able to tap that, and mount a switch right over the receptacle. Then the UF cable goes out thru a new hole in the wall, and over to the new exterior box & GFCI & “Taymac.” A smaller Suncast deck box would hold the fan with its new cord; the box would be modified for a weatherproof cable pass-through.
Thanks for helping me think this through Dan,
Cliff
Why cant the cord pass through the box with the duct? That way you don’t have to drill through concrete. Since the duct is round, and the box is square, there are corner spaces you could pass the cord through, and with a grommet on the inside, where it passes through the box, you could stop air leakage.
It could Dave, but I feel the need to show that the fan is only “temporarily” plugged in, and its cord not permanently engaged with the box (or laying in the dirt over long periods of disuse).
All I’ll do is make a notch in the box under the lid, and slide some split foam tube insulation over the cord at that area. That way it gets sealed up when closing the lid and is easily flopped back in. That’s my theory at least.
[Edit] Sorry Dave, I just realized you were talking about the window box. Yes, I was tempted… thought about it last night. Great minds thinking alike and all that, haha! I was even briefly considering running an extension cord through the duct, poking it out a couple holes and calling it a day. But I’m now convinced a permanent outlet box is in order, and I’d rather stick to conventional methods for it. I may need to only drill through the wall sill boards, they’re near shoulder level outside.
Thanks, I always appreciate your ideas.
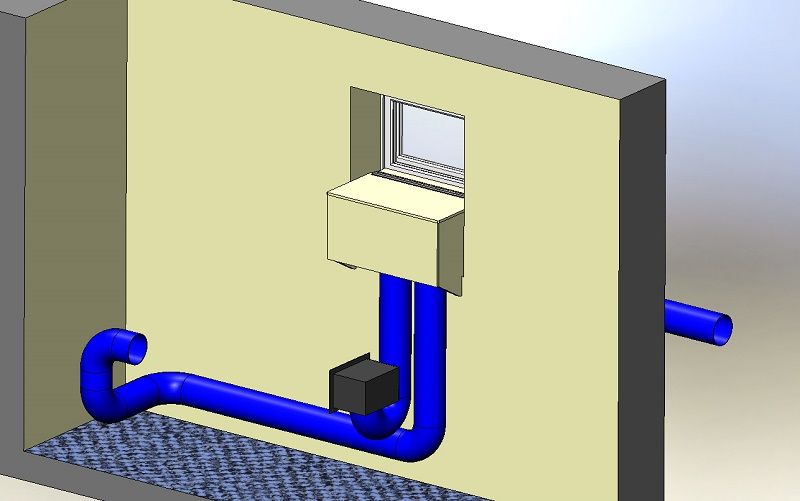
Here’s the system diagram, as things stand.
[edit: I removed this figure, in favor of the one posted subsequently.]
Cliff Jennings said:
Dan,
Sounds like you have a similar system?
Thanks for helping me think this through Dan,
Cliff
Yeah, I have the little one. I bought it to try out laser cutting to see if it was something I’d be interested in getting serious about. I built a little bench/cabinet to hold it and the associated paraphernalia (water pump and reservoir, PC, etc) next to the garage door. When I use it, I just toss the duct out the door and switch it on.
I made some laser-cut houses
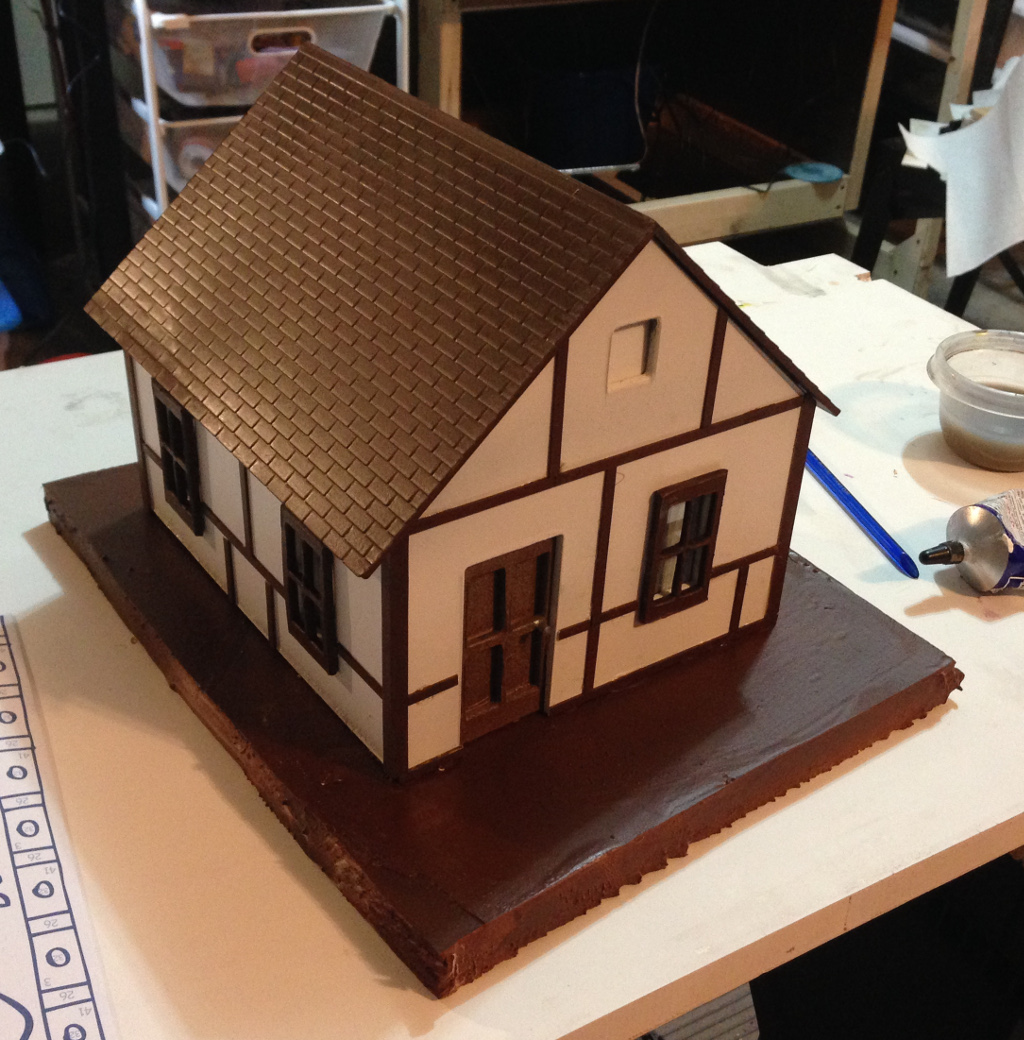
made some replacement window panes

and a little speeder

(still not done… Squirrel!)
The problem is, as always for me, that I have literally dozens of projects noodling around in my head, on paper in the planning stages, started, mostly finished, waiting for me to get interested again, waiting for me to figure out a hiccup, etc. I think laser cutting is interesting, but the limited speed, bed size, etc of a consumer unit means that some of my amazing ideas aren’t likely to come to fruition on the $300 machine I bought.  I’ve also got a full time job, three kids (10, 7, and 4), going to college for an automotive restoration degree, and for some reason my wife expects to see me occasionally. (http://www.largescalecentral.com/externals/tinymce/plugins/emoticons/img/smiley-cool.gif)
Anyway, keep the updates coming. It’s interesting to see where you’re going and fun to follow along.
Cliff
The exhaust fan intake is at the center of the fan, opposite the motor. Your drawing depicts the discharge as the intake or suction connection.
Michael
Dan Hall said:
The problem is, as always for me, that I have literally dozens of projects noodling around in my head, on paper in the planning stages, started, mostly finished, waiting for me to get interested again, waiting for me to figure out a hiccup, etc.
Oh, someone else Devoning. So, at least Devon and I aren’t alone.
I thought that “standard practice” was to locate the fan as close to it’s intake as possible so that it primarily blows rather than sucks.
Michael, I’m hanging my head in shame… good catch, and thanks!!
Dan, those are sure beautiful, thanks for those pics. My story is similar, working full time, but with only one more child (of 4) to get through college. I’m trying to tool up for for when I can go part time for work, whenever that happens. And I need gobs of custom buildings for the layout… hence this cutter project.
Todd, the machine’s design uses the fan to suck air out of the cutter’s cabinet and eject it from the fan outdoors. It’s hard for me to place the fan closer to the window box, and that’s where the inlet is (they need separation). But, if push comes to shove, I can rearrange the outside walkway and move the fan closer to the window at a later date, but only if that seems needed.

OMG= Oh MY Gram!
Quit screwing around and just plug it in Cliff!