Large Scale Central

2016 Challenge Build Log -- The Yankee Girl Mine

Late to the party, but here’s a couple thoughts.

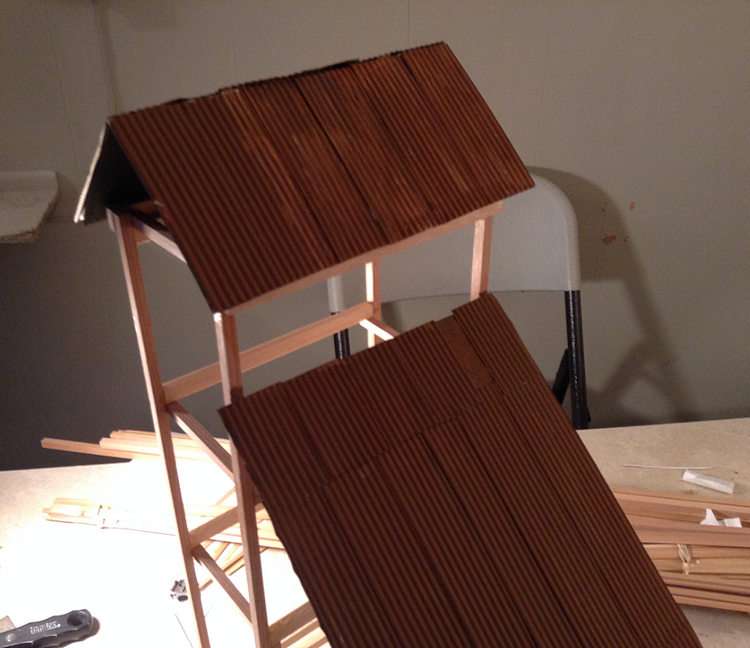
The OP pics 5-7 show that the major diagonal braces are acting against cable tension. It’s a pretty safe bet that a headframe’s main diagonals point to the hoist.

There doesn’t seem to be a door beneath the cable opening (for, e.g., trams & buckets & such), only a small hole & special roof section to permit the cable to enter.

There are no boiler stacks in the headframe building, so prob no hoist engine there.

The stacks are behind, in a separate building; so the hoist was probably there as well.

The small A-frame-like structure & sheave were, to my thinking, a hold-up means for the cable as it was conveyed to the hoist house.

Just an opinion,

Cliff

A little background on the Yankee Girl. In the Red Mountain mining region, she was the only vertical shaft mine. They went straight down, at the 75ft level was the first drift, and they used it to dump the waste ore at that level.

This pic is dated 1889. The tracks in the foreground were mine tracks from the first level, running over to the waste dump.

Nice pic Dave. In this same era, they sometimes used the same adit approach for dumping waste on the Comstock as well. E.g., the Chollar and Gould & Curry. One can still go into the Chollar mine in Virginia City, and the tour is by way of its waste adit.

Most likely, the bin adjacent the headframe (enclosed in the same structure, and opposite the main diagonal braces) collected the ore for transport. An enclosed headframe sure makes a lot of sense: it captures the warmth coming out of the shaft, keeps the snow off the working areas, and thus permits operation year-round. Looks like they even had a sort of garage door for the ore wagon to enter.

The Comstock headframes were similarly enclosed, but in a larger facility housing the hoist engines and boilers as well. The Yankee Girl is neat, because those functions were, for some reason, structurally separated – and by quite a long distance!

Okay. The approach is to restore the mine to its original operating condition but maintaining the current look/shape of the structure. It’s kind of a RESTO/MOD in terms of cars like I see on the cable television auctions!

It’s kind of pathetic how far behind the crew is compared to the other fine builds, but you gotta start somewhere! First, the desk must be cleared, then gather the prize from last year’s challenge:

Then comes the skeleton of the mainframe tower:

Then the factory started producing/milling wood siding (here’s the waste at the factory):

And here’s the first delivery of siding:

Okay okay okay I know it’s not exactly a dramatic burst of production, but there will be more updates to follow…

Nice start John. I’ve enjoyed the history lesson too.

Hmmmm. Some of that lumber looks familiar… (http://largescalecentral.com/externals/tinymce/plugins/emoticons/img/smiley-wink.gif)

John Passaro said:

Okay. The approach is to restore the mine to its original operating condition but maintaining the current look/shape of the structure. It’s kind of a RESTO/MOD in terms of cars like I see on the cable television auctions!

It’s kind of pathetic how far behind the crew is compared to the other fine builds, but you gotta start somewhere!

John

Don’t worry about the other builds only yours! If you finish on time “fantastic” if not that’s ok because you are building something that you want and the challenge put the fire under your butt to get going.

That’s all that matters!

I actually agree with Rooster. But John numbers matching OEM parts make it worth so much more.

Devon, only to a true collector. To those of us who aren’t true collectors, its a wow thing, even if the numbers don’t match, and there is a '59 water pump on that there '48.

David Maynard said:

Devon, only to a true collector. To those of us who aren’t true collectors, its a wow thing, even if the numbers don’t match, and there is a '59 water pump on that there '48.

lol I couldn’t agree more. I watch Barret Jackson and it amazes me what makes the difference in a cars fetching price. Cars I like way better go for less than cars that I say eh that one is OK. I get why its that way the purists always will pay more and there will always be those of us that are willing to settle for much less and be just as happy. eh so bit each of us to our own. There’s plenty of room for everyone in their hobby also.

Made some progress, started getting the general shape and framework of the main structure:

I decided to include the small add-on shed that shows up in Dave’s pictures of the mine…

Started getting the shape of the structure in the framing…at this point, Proportions are Everything!!. If it ain’t right at this stage of the game, it’ll never look right no matter what kind of finish is added later, so I’m spending some time on this:

…including the base for the roof corrugated roofing…

Well, then, I found out I needed some longer, bigger lengths of framing wood, and What did I find??, Well, I found more of Travis’s prize from last year tucked away in piles of wood! Also I brought in the shipment of tin from Taylor’s Tin Works, Challenge Township:

Got the tin installed, then painted it a basic rust brown…I don’t know what level of rust, finish, newness, etc etc, I will settle on, but this at least give a base start to work with.

I don’t feel that I’ve gotten much accomplished compared to the time I’ve spent on this; not very productive, but that might in part be because of the was I’m gluing the framing together and waiting for it to dry. I try to work on other parts while it’s drying but I don’t know: I’m used to making more progress more quickly. It’ll probably pick up from here though I suspect…right up until I get to the windows. Windows kill me! Yikes!

Taking shape

So I’m looking at different levels and types of rust and found some various samples off the internet, some from stock photos, some from railroad layouts. I could do any of them even though I’ve got a basic coat down. There’s quite a range and I thought I’d post them here seeing as we’re all using tin. I didn’t include newly installed corrugated roofing because we all know what that looks like. Naturally the final choice is a matter of personal taste.

edit: one was looking for a video! changed.

I think that knowing what your going for it might require a combination of things. Your making a resto mod so that means a mix of old and new to be functional. So any horribly rusted panels no longer serving their purpose would be replaced while weathered panels still doing there job should be retained. In no way do I think it should be uniform. Pictures 7 and 10 looked used but serviceable to me. Throw in a new replacement panel here and there and a few that are in desperate need and the balance being heavily rusted but holding up. Thats my 2 cents.

BTW This project has me all of a sudden looking at corrugated metal roofs. What amazes me is just how rust free the older buildings around here can be. I was surprised just how well the stuff is holding up.


¿ ɹəʇsooɹ said:

Don’t be shy, Rooster, spit it out!

Looks like your making good progress to me John. It’s tough some times to know when to quit thinking and start doing. Now that you have the frame work together things should pick up speed. I’d have to agree with Devon’s opinions on the roof. Keep at it, it’s looking great so far.

That is looking pretty cool John, Keep at it… (http://largescalecentral.com/externals/tinymce/plugins/emoticons/img/smiley-smile.gif)

looking like progress, is coming along really nice. You are doing a nice job of displaying your progress

Dennis

That’s right, I’ve officially gone loony now. I’m actually building this mine one stick at a time. You must be kidding. I keep thinking of that old song, “They’re Coming to Take Me Away, Ha, Ha!”

But I like the results, so what’s to be done?

Well, here’s the progress I’ve made so far. The last next to last two pictures are of my practice weathering of the wood, which I’m doing on the inside of the structure. I used sepia ink and blue (both artist grade and both water-based; I actually use them to draw with). Too dark right now I think, or maybe there isn’t enough variation (more likely). I’ll keep experimenting. The last picture is the first window I’ve managed to get in place, this one is in the shed and it’s cannibalized from an LGB German passenger station I’ll never put together.