Large Scale Central

My Permature 7.5" Gauge Adventures

This is the story of an overly eager rail enthusiast who couldn’t wait to build his empire.

When I was about 12 I learned of the existence of 7.5" gauge railroading and have yearned ever since to have my own track and equipment. 30 years later I found my self and family finally moving to a property that could support such a pursuit. We took possession of the new house the last day February in 2017. It was a busy time trying to make all our things fit the new house, get our son started on his first year of school and get settled in at a new job with a significant learning curve. Yet in spite of all of this, I must not have felt challenged or busy enough. Or perhaps it was just knowing that it could finally happen that had me picking up my first 300 feet of 7.5" track in October. Shortly after I answered an add on Discover Live Steam and purchase a small electric loco and flat car.

Track sections

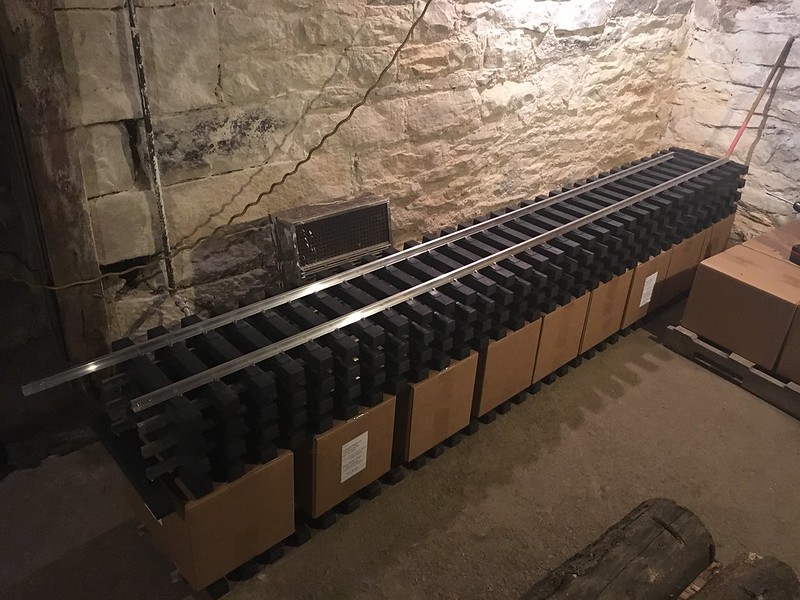
Well, winter was setting in, so I stored all of the boxes of ties and rail in the basement. It was the only free and unfilled space in our new home. The engine and car were crammed into the already full garage. The a fore mentioned ties I purchased were from Accutie Rail Systems. These are the awesome ties that have been well documented in Gary Armitstead’s thread, who also helped fan the flames of my indulgence. I used some of the full boxes of ties to set up a “build table” in the basement where I could assemble sections of track.

Trial fit

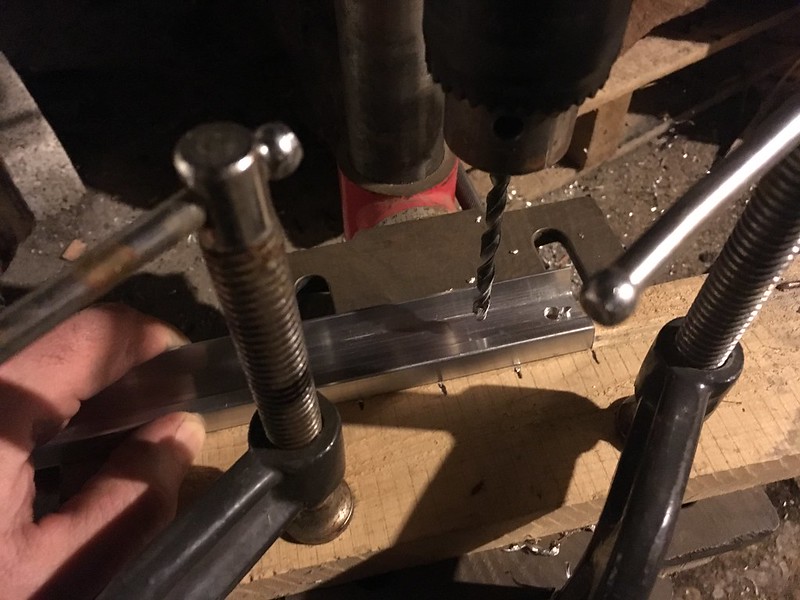
I brought in my bench top drill press and found a spot central in the basement where I could fit the 10" length of rail on either side of it. I set up a crude fixture where I could align the rail with one of two marks and drill the holes to bolt on the fish plates. Once one end was done I slid the rail to the other side and drilled the opposite end. This worked well and saved me spending the $50 dollars on those nice vise grip drill guides until later. I will be getting those at some point, They will be very useful when I am drilling track side on location.

Switch

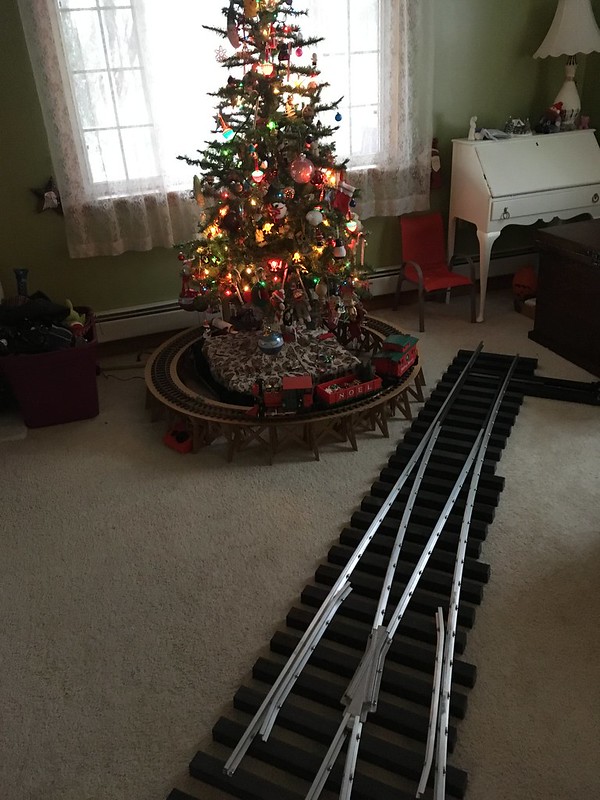
I also bought a rail bender but did not have the same great experience Gary seemed to have with his. I could never really seem to dial it in to the exact radius I wanted. It always came out too tight or too broad. I have plans to modify it with a screw adjustment feature that I think will turn it into a very handy tool. With all of my track sections now built I set about putting them in place out back. The only problem with this was that winter had now arrived, so I was braving the cold to bolt track sections up, or waiting for a day when the ground would thaw a bit to level the grade some what. Don’t let me fool you in to thinking I did that much grade work as you will see in the over all shot of things below. It was just after Christmas when I got to the point where I needed to invest in my first switch. I ordered a #5 kit from Acutie and it was delivered in short order. The kit was fantastic with everything needed, including very detailed instructions. All the ties were numbered so you just had to lay them out in order. They also had pre-drilled holes in them the corresponded to pre-drilled holes in the rail so you could just lay down the rail and start screwing things together. Within 90 minutes I had complete switch ready to go. This allowed me to finally complete the initial setup the way that I wanted as seen below.

Switch

Starter set

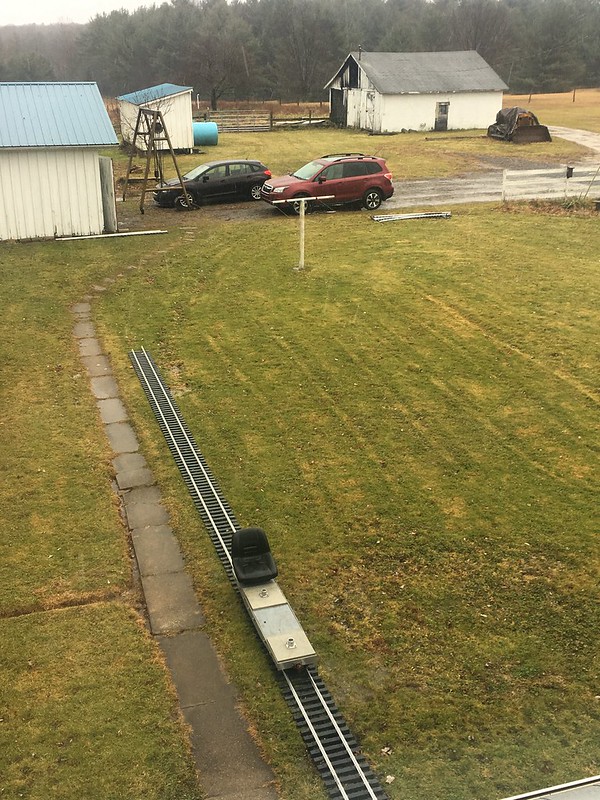
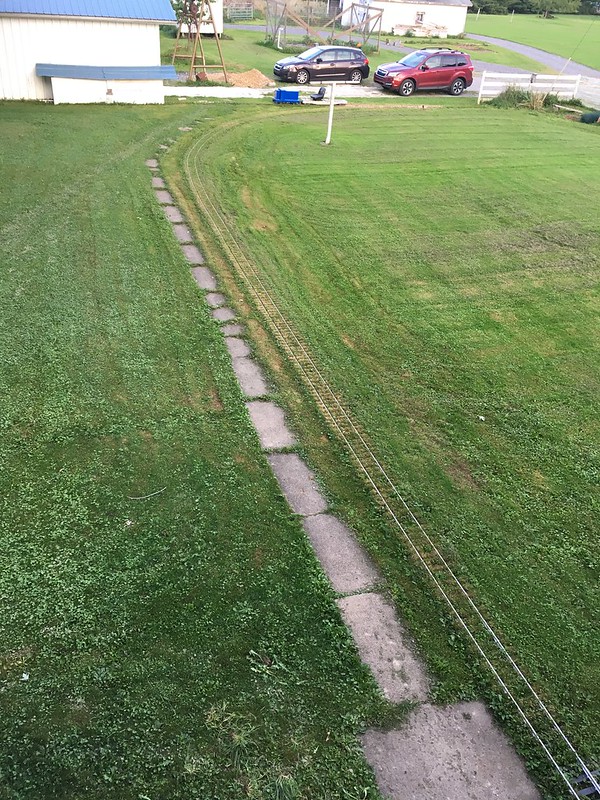
As I mentioned before, I did very minimal work in the way of preparing the road bed. It basically amounted to getting rid of humps and filling the holes in with them. The moving truck left some pretty deep ruts right along the sidewalk where the track now sits. I didn’t bother to do much more in the way of prep or proper road bed with ballast since this is really just a temporary set up to get something running. The idea was to be able to have a little place to ride and also have it serve a purpose to aid in getting car loads of things from the dive to the house. My wife really does appreciate having it there. As you can see in the photo the grass wasted no time growing right up between the ties. It hasn’t been to bad since I just raise the push mower up and set it right on the track and mow right down them. The train shed along side the garage was the former dog house I cut in half and re oriented the roof of. It serves well at keeping the rain and weather off the equipment.

Starter set

The picture above is of the locomotive and flat car I bought. The loco is just a little 2 axle 24 volt center cab freelance, that was built from scratch. The flat is very nicely detailed with hundreds of rivets and rust free aluminum construction. Eventually I would like to build narrow gauge equipment to ride the rails rather than the standard gauge starter pieces that I have, but I’m grateful to have these to get me going. I certainly haven’t had near the time I’ve wanted to play with this all at this point but I don’t honestly regret squeezing it all in any way. As for the future the current line will more than likely be pulled up in the spring of next year once some construction we are planning on the back of our house starts. After that I’m not entirely positive where or how it will go back in, but it will and in a much more permanent fashion.

Very cool Randy. I envy your being able to do this. I might have room for a small up, but no time nor budget for it at the moment.

Its another disease you can catch hanging around sites like this and the people that hang out here. Enjoy the ride, its another great train adventure.

Hey Randy,

Welcome to the BIG stuff (we call this the “Hernia gauge” you know :)). You’ve got the “disease” now and you will have it for the rest of your life. I wish I had the property you have for a layout.

I’m sorry to hear you had issues with the bender (was this Rich Eaton’s bender by any chance?). I had to experiment a little when I first got it. I’m lucky that I have software to layout the track radius and make little “chord” fixtures to check the radius. That helped me a lot. I’m interested to see what you do to make a screw adjustment for it. I did approach the bend cautiously and marked some “tic” marks on the bender on the cam wheel. If you check out my posts on the turnout build, I had to do a couple of tweaks to the curved stock rail and once that was “set”, I used that setup to bend the the short “closure” rail. The Acute Rail System is fast and foolproof. I can’t believe how quickly you can make track panels (both straight and curved) and have the gauge “dead” accurate also. I am just about finished with the final assembly of my turnout and I’m finding the turnout is becoming more stable and sturdy with every track screw I add. These turnouts are more sturdy and stable in THIS scale than my Sunset Valley RR turnouts in 45mm!! I think I can have my turnout in place on my shoreline by Wednesday…FINALLY :)!!!

BTW, what radius are you using on your layout? Looks to be roughly 25 feet or so. I love your electric engine and flat car. What are you using for the motor controller? A SyRen 50 by any chance?

Good to see your dream has become a reality for you :). You and your family will be getting years of enjoyment from the railroad. Thanks for posting.

Switch

How heavy is that engine , were you need an engine hoist to load it into the Rav 4 ?

Very nice start !

So, does this mean the Garden layout is put on hold, or has it been nixed altogether?..(https://www.largescalecentral.com/externals/tinymce/plugins/emoticons/img/smiley-wink.gif)

Thanks guys, Yes very exciting, and it takes things to a whole new level. Definitely costs more than F scale too, but you “can’t” accumulate so many cars in this scale so it begins to even out a bit. Also I want to build my own steam and rolling stock from scratch so it will be slow expenditure as I have time to build.

Gary Armitstead said:

Hey Randy,

These turnouts are more sturdy and stable in THIS scale than my Sunset Valley RR turnouts in 45mm!! I think I can have my turnout in place on my shoreline by Wednesday…FINALLY :)!!!

BTW, what radius are you using on your layout? Looks to be roughly 25 feet or so. I love your electric engine and flat car. What are you using for the motor controller? A SyRen 50 by any chance?

Good to see your dream has become a reality for you :). You and your family will be getting years of enjoyment from the railroad. Thanks for posting.

Thanks Gary,

Yes, the track is very rigid once assembled. I’ve been real impressed with it so far. Just waiting to se how it does under heavy 2.5" scale equipment. That’s why I kept tie spacing close. I was shooting for 30’ radius on that bend, but I think it came in closer to 25" to match the walk way better. Good Eye. I’ll have to look on the motion controller, I have that info some where. I believe the company is out of business though.

Sean McGillicuddy said:

How heavy is that engine , were you need an engine hoist to load it into the Rav 4 ?

Very nice start !

Sean,

I think it goes about 250# fully loaded. I brought both the loco and car home in my Subi Impresa (don’t tell it it’s not a truck) the little car in back. When I unloaded it I took one of the two batteries out and then picked it up and put it on the garage floor nearly getting one of those hernias Gary mentioned! The steam loco I’m wanting to build in 2.5" scale should come in around 1000 lbs. Cranes and lifts will be needed for that.

Ken Brunt said:

So, does this mean the Garden layout is put on hold, or has it been nixed altogether?..(https://www.largescalecentral.com/externals/tinymce/plugins/emoticons/img/smiley-wink.gif)

Don’t worry Ken,

The F scale is far from nixed. I even just put a pile of chimney rubble where the one island loop will go to begin the build up. I also just picked up a second live steam #12 too. I plan to get started in earnest this spring.

Image result for crazy car loadswho needs a pickup ?

Ya know you’re not fooling anybody with that hot rod avatar, we know you are a full blown train nut!

The idea was to be able to have a little place to ride and also have it serve a purpose to aid in getting car loads of things from the dive to the house. My wife really does appreciate having it there.

Hey Randy,

Really fun little railroad you have there. Always good to have a proper reason for it to exist!

Roger (Cutter) had a 7.5" gauge “portage” railroad that he laid from the road to the top of the storage tracks on the outdoor layout. He said it was to help us bring our boxes of trains on Open Days, but it was really an excuse to play with big trains and make something so big he couldn’t pick it up. The latter was an EBT hopper, which he got as a kit of parts from someone, already cut to size and ready for riveting.

Email me (or Rog) if you want more info.

Randy,

My radii here on my small short line is 25 ft. to a mazximum of 32 ft. Good enough for my 2 two-truck Baldwin electrics and my Eaton Super Husky. Longest car is a 72 inch steel gondola. When you start running the 10 ft. long RRSC heavyweights or streamline passenger cars, you definitely need a bigger radius. Those are massive cars.

The Accutie Rail System is being used at Orange County Model Engineers (a live steam club in Costa Mesa, CA.). They replaced all the rail and ties with Accutie. They run quite a bit of 2-1/2 inch and 3-3/4 inch scale NG steam and some diesels (RMI Models). Not a problem so far (over 5 years in the ground with the new ties. That club has many actual miles (not scale miles) of track, one of the larger clubs in the country.

Steve Alley, owner of Allen Models of Nevada is the West Coast distributor now of the Accutie System (my source). Last night he sent me a few photos of a custom 7-1/2 gauge layout he built for a client in Riverside, CA. Deep in the orange groves. I will send these to you for inspiration for your growing layout. Some neat landscaping ideas. A beautiful estate! Just need an email address to send them to you. I would post them on LSC, but they might be proprietary. Not sure.

Ha!, Yeah Sean that’s exactly how it seams some days. (https://www.largescalecentral.com/externals/tinymce/plugins/emoticons/img/smiley-sealed.gif)

John Caughey said:

Ya know you’re not fooling anybody with that hot rod avatar, we know you are a full blown train nut!

We’ll your right John, but I’m not sure if a 75 CJ5 counts as a hot rod. That was my buddy’s that I wired the engine bay of, thus my head stuck in it. I have a 79 CJ5 and an 80 J10 pick up in the garage both just awaiting some minor finishing. I’m really just a sucker for machinery and the older the better…

Pete Thornton said:

The idea was to be able to have a little place to ride and also have it serve a purpose to aid in getting car loads of things from the dive to the house. My wife really does appreciate having it there.

Hey Randy,

Really fun little railroad you have there. Always good to have a proper reason for it to exist!

Roger (Cutter) had a 7.5" gauge “portage” railroad that he laid from the road to the top of the storage tracks on the outdoor layout. He said it was to help us bring our boxes of trains on Open Days, but it was really an excuse to play with big trains and make something so big he couldn’t pick it up. The latter was an EBT hopper, which he got as a kit of parts from someone, already cut to size and ready for riveting.

Email me (or Rog) if you want more info.

Right Pete, Just wanted to get something down for fun and I fell function is part of the fun. The eventual permanent set up will be built to do some actual work for me too. Yes!, I’ve see Solid Design. His stuff looks very appealing. Who would have though you could get a Vulcan truck in 2.5" scale. I haven’t got the nerve up to contact him for more info yet. I may some day however.

Gary Armitstead said:

Randy,

My radii here on my small short line is 25 ft. to a mazximum of 32 ft. Good enough for my 7 two-truck Baldwin electrics and my Eaton Super Husky. Longest car is a 72 inch steel gondola. When you start running the 10 ft. long RRSC heavyweights or streamline passenger cars, you definitely need a bigger radius. Those are massive cars.

The Accutie Rail System is being used at Orange County Model Engineers (a live steam club in Costa Mesa, CA.). They replaced all the rail and ties with Accutie. They run quite a bit of 2-1/2 inch and 3-3/4 inch scale NG steam and some diesels (RMI Models). Not a problem so far (over 5 years in the ground with the new ties. That club has many actual miles (not scale miles) of track, one of the larger clubs in the country.

Steve Alley, owner of Allen Models of Nevada is the West Coast distributor now of the Accutie System (my source). Last night he sent me a few photos of a custom 7-1/2 gauge layout he built for a client in Riverside, CA. Deep in the orange groves. I will send these to you for inspiration for your growing layout. Some neat landscaping ideas. A beautiful estate! Just need an email address to send them to you. I would post them on LSC, but they might be proprietary. Not sure.

Thanks for the info Gary, good to hear it’s holding up well for the OCME group. I’m going to get acquainted with a local club once I get a bit more into working on equipment and the home track in the next few years. I’ll send you a PM with my email, I’d love some more inspiration.

The F scale is far from nixed. I even just put a pile of chimney rubble where the one island loop will go to begin the build up. I also just picked up a second live steam #12 too. I plan to get started in earnest this spring.

If you need to get your mojo working, I’ll probably have another Ops session in April. You may even see Rooster there, dirty knees and all…(https://www.largescalecentral.com/externals/tinymce/plugins/emoticons/img/smiley-wink.gif)(https://www.largescalecentral.com/externals/tinymce/plugins/emoticons/img/smiley-cool.gif)

Randy,

You made a comment about having trouble getting your rail bender to generate the correct curve for you. How close were the radii on your turnout kit from Accutie? They bend their rail using a NC bender, I believe. When you order rail from them, they will bend it for free :)! Free is always good. Mike Toney (member on here), just purchased a RRSC 25-ton critter and played some track in his backyard. Believe it or not, he had Accutie bend the West Coast aluminum rail down to a 10 ft. radius (20 ft. diameter! I didn’t think anybody would be able to get it that sharp, but Accutie did with their bender. :slight_smile:

I believe Mike posted some photos of his oval on here or MLS. Quite an achievement.

Randy Lehrian Jr. said:

I’m going to get acquainted with a local club once I get a bit more into working on equipment and the home track in the next few years.

Like the 2 foot gauge group over in St Mary’s (https://largescalecentral.com/externals/tinymce/plugins/emoticons/img/smiley-wink.gif)

Ken,

That sounds like a plan. I should finally have free time by then. We do live in farm country now, so I’m used to seeing roosters around. Not sure I want to know why his knees are dirty. (https://www.largescalecentral.com/externals/tinymce/plugins/emoticons/img/smiley-foot-in-mouth.gif)

Thanks for the heads up Gary,

I did know that they will bend the rail for you. I just would rather have the ability to bend to my immediate need as I build. My issue was that any time I loosened the bolts on the adjustable wheel it would move out of position and there was no way to make a fine adjustment. I plan to weld a steel block from plate to plate and then create a U strap that the axle ends of the adjustable wheel will pass through. There will be a large fine thread screw that passes though the bottom of the U and will push against the welded on plate. This will pull the adjustable wheel into the rail and allow fine adjustment via the bolt even while the rail is in. I just need to finish building the shop so I can do such mods! (https://www.largescalecentral.com/externals/tinymce/plugins/emoticons/img/smiley-embarassed.gif)It’s close. I’m pretty sure the Eaton bender would do a 10 ft radius without much problem. I made an adjustment at one point that was much larger than I though and it put quite a bend in the beginning of the rail.

Randy Lehrian Jr. said:

Ken,

That sounds like a plan. I should finally have free time by then. We do live in farm country now, so I’m used to seeing roosters around. Not sure I want to know why his knees are dirty. (https://www.largescalecentral.com/externals/tinymce/plugins/emoticons/img/smiley-foot-in-mouth.gif)

Roosters have dirty knees as they are working Roosters . They have “Equipment and know how to use it” !

You can travel RT 322 (scenic wise) to Kens as it’s a direct route from Clairon. Spent a lot of time up that way back in the day and toured the Brockway Glass plant in the late 80’s when it was closing . Lots of neat RR history up that way.

Randy,

The thing I found most interesting about trying to be “precise” with the bender was that when I would draw the arc and chord on MasterCam, the amount of actual arc didn’t make a lot of difference. Near the end of the construction on “our” turnout, I actually cut a large piece of 2X4 with the arc in place as a guide and clamped the outside curved stock rail to it. There was SOME spring, but after installing the track screws, you never knew the difference :).

I’m sure the Eaton bender would do a 10 ft. radius…it’s truly a stout bender! I received some bent curved rail from the original west coast distributor (Northwest Rail and Foundry. I was going to complain, but after talking to Rich Eaton (he said his rail bender would straighten that rail easily), I purchased his bender and saved all the “damaged” rail. I also made the same mistake of over adjusting the cam wheel and really getting a sharp radius… When I finally got a little more familiar with the bender, I was only moving the pointer on the wheel about 1/32 of an inch at a time!

Randy Spring is coming … are you going to come out and play/work on this monster… (https://www.largescalecentral.com/externals/tinymce/plugins/emoticons/img/smiley-wink.gif)