Large Scale Central

SD60f Build

Canadian National SD60f Build

This thread will follow the construction of an SD60f. I will make it as detailed as possible. It will be a slow project, so if you follow it, you will have to be patient.

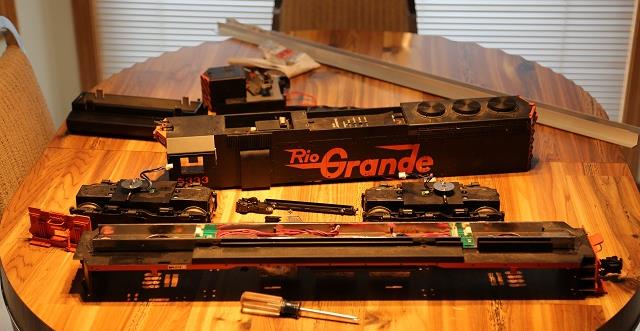
This build will require an Aristocraft SD45, 2 pieces of aluminum angles 1/16” x 3/4” x 25 1/2”, 3 USA trains SD70 roof fans, and lots of styrene.

You will need the SD45 trucks, electrical components, end plates/steps, fuel tank and air reservoirs.

First thing you are going to need is a 27 1/2" x 4" x .125" styrene base.

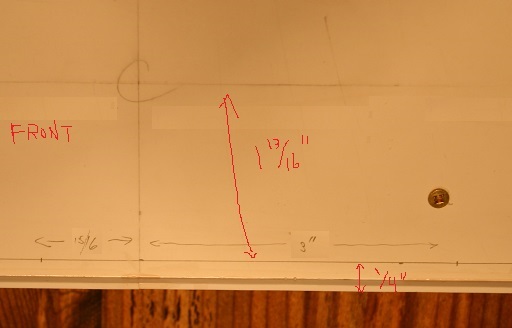
Both ends will need to be cut as shown below. Keep the pieces you cut out as we’ll be using them later.

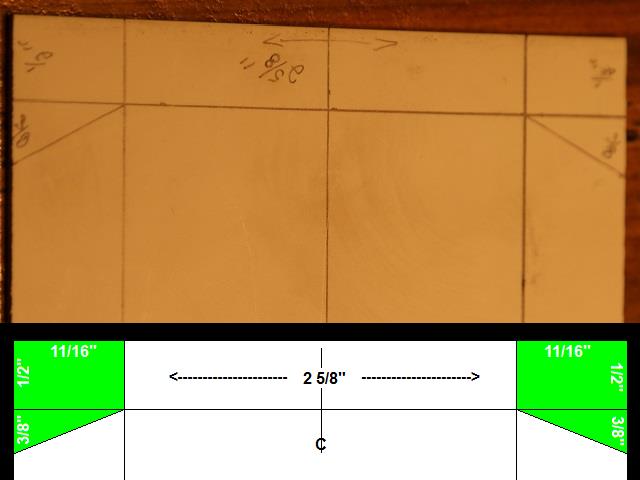
Now mark your top side, and mount the two aluminum angles. Mount them a 1/2" from the sides and 1" from the ends. I used 6 screws on each one evenly spaced out and it should give you a fairly sturdy base to work with. You can also mark the front and rear to avoid confusion later.

Important - Mark your base center lines on both sides for length and width.

Cool project!

Always have enjoyed a loco build.(http://largescalecentral.com/externals/tinymce/plugins/emoticons/img/smiley-cool.gif)

Here is a video of some HO models.

A pair of full cowl, HO Scale Canadian National GMD SD60F’s. The shells are made by Kaslo Resin shops. Both locomotives are equipped with Soundtraxx Tsunami AT-1000 decoders and 603 SMD “Sunny White” LEDs for lighting.

Here is a video of the full sized models.

Wow Shane, I’m excited to follow along with you on this one.

I’ve been wanting to Build some 2 and 3 window SD60M’s as well as a few standard cab SD60’s

Well I don’t know if I can match Ray’s skills, but hopefully these instructions will be similar to the ones he supplies for his fantastic buildings.

Eric, this project does leave lots of parts for other projects, including a standard cab. Another nice feature is that if things don’t work out for people, they can just put their SD45 back together.

Our next step is to set up the ends of the base to accept the SD45 steps and end plates.

Here’s what we’re going to do. Take some .06 x .125" strip and cut 1 (red) 2 5/8" piece, 2 (green) 1 5/8" pieces, and 1 (brown) 3cm piece. This step will use a couple of metric measurements only because they are an exact match to the original. The light blue are the step cut outs from the previous post. The brown are two .04" shims. I used 1/4 x 1/2", but you can use anything that fits.

1)Apply red piece 1/2" from the end. You should already have a line from the previous post. Narrow (.06) side down.

2)Apply the two green pieces. The outer edge is 17mm from center.

Hold your end plate in place, and add your cut out pieces (light blue). You want them snug, but not tight, and make sure they do not extend over the side of the base.

Once the light blue pieces are secure, hold your steps in place again. Place the blue piece behind the steps, again snug, but not tight. Add the two brown shims and mark and drill for the screws.

It should look like this when you are done. Make sure you do both ends of the base.

I added a .02" on top of the red piece to snug things up, but it’s a little too much. A .01" strip should be enough to make the steps sit nicely.

Now we have to drill the holes for the trucks. This part is a pain in the butt, and I do not look forward to doing it again. Use your SD45 base to help with your measurements.

Start with a 9/32" hole. The center of it should be 3 13/16" from the end of the base. Draw a 1/8" wide ring around the hole. Be careful not to damage this area as I think it would be difficult to repair with any strength. Now you need to make the 1/4" holes on each side. I started with 4 small guide holes.

I drilled four 1/4" holes and then carefully cut and shaped between them.

Half an inch behind these holes, you need a cut for the electrical to feed through. I made a 1/4 x 3/4" cut like the original, but it is probably easier to drill a couple holes and cut out between them.

Now if you survived that step, we’ll make this one easy. Start with a 3 1/4 x 1 x .06" piece of styrene. We need 4 isosceles trapezoids. (Like those big words :P) Base 1" Height 1" Top 1/2"

These get secured on both sides of your truck cuts.

Now for the frame skirt you’ll need four 14 x .25 x .06" pieces of styrene. Mark the lengthwise center of your base and apply two pieces per side keeping the top flush with the base. You’ll have a joint in the middle that you might have to fill and sand. The SD60f skirt is the same height across the entire locomotive which makes this part easy.

You can leave the end overhangs for now. We’ll deal with them later.

At this point we have a nice base for our model. You can easily build different base lengths using these steps. For narrow hood models, you would need to find a way to adjust your reinforcement to keep it inside the body.

Cool project Shane, I have an USAT SD40-2 sitting here just might make a good starting base for this.

very nice!

please don’t take this any wrong way.

You could use the appropriate sized rails under the engine to look like the way the real one is built. I used pieces of plastic I beam. Another guy used brass. That was nice as he could solder on the appliances and lines. I glued mine on.

http://largescalecentral.com/albums/photo/view/album_id/11857/photo_id/106851

Steve, 6 axle base is all you need. You might have to adjust some measurements between brands, but that shouldn’t be hard.

Thanks John

Joe, I don’t think you could get away with that on this one. The trucks rest on the base so I don’t think you could run a full length frame without obstructing them, and at the same time supplying the strength you need. The prototype frame is recessed by 2’ which is about 1" in G. These also sit at least 10" lower then the new SD70-2’s/ACE’s.

BTW your SD70Ace looks nice.

ooops, that would be a problem

I’ll apologise now if people find these instructions tedious. I’m hoping they will allow anyone to build the model.

So now we’re going to mark and drill the holes for mounting the air reservoirs. On the bottom of the base, you want to start with a lengthwise line 1/4" from the outer edge which includes the skirt. The skirt may make this measurement difficult, so you can also go 1 13/16" from your width wise center line. Take great care with these measurements as these holes need to be accurate.

Now your front center points will be 15/16" from the length center line and the rear will be 3" from the length center line.

Now mark the center points with an awl, and drill four small guide holes.

Now drill the full size holes. Make sure to take note that the holes are a different size. Be careful to get the sizing right. I drill the main holes with my power drill, but I do not use power. I find I have more control if I secure the base, hold the drill in place, and then turn the chuck by hand to drill.

Now your SD45 conductor’s side reservoir needs the end braces cut off flush with the reservoir. Once trimmed, it should match the engineer side. You can test fit, but do not mount them at this point. We want to keep the base flat for now so that it is easier to work with.

Great instructions so far and enjoying the progress!

Shane, There is no need to apologize for the detailed instructions. This is a great build(http://largescalecentral.com/externals/tinymce/plugins/emoticons/img/smiley-cool.gif)

agreed. all of this helpful for hacks like me

Great idea, Sir, but I’m screwed from the word go. I have absolutely no idea of where you might obtain a piece of styrene anywhere near that big over here in UK.

tac

OVGRS

Thanks for the feedback Guys. We’ll keep plugging away

Oh no, our fuel tank is too short.

On the bottom of the base, mark the fuel tank extremes 4 3/4" off center. Our completed tank will sit within these lines.

We need to extend the length of the fuel tank by 1 1/16". I staggered the cuts as I’m hoping it will strengthen the completed tank. Glue it really good and set it aside for now. You may want to glue it multiple times to make sure the two sides are well secured.

Do not fill the gaps yet. You can get rid of the fuel gauges and access panels (or is that a second fuel gauge???) These two details need to be filled and sanded smooth.