Large Scale Central

The Assembly of "Mariner"

19 November, 2019 - Carlyle, Illinois

.

I’m starting a new thread on the merging of the “Tram” boiler and single cylinder marine engine with a “Conner Beam” frame, I’ve had for a number of years. This resolves my wheel spacing and suspension concerns.

.

Once again I try to post a picture.

.

http://largescalecentral.com/filesharing/file/view/14476/19111901tram-jpg

Who knows, maybe I’ll remember how to post pictures again as I document this. Stay tuned, if you wish.(http://largescalecentral.com/externals/tinymce/plugins/emoticons/img/smiley-cool.gif)

Here ya go, Ric (http://www.largescalecentral.com/externals/tinymce/plugins/emoticons/img/smiley-wink.gif)

I’m interested in watching this come together. thanks for taking us on the journey with you.

You need to move that car out of the garage to make room for the machine shop your going to need…(https://www.largescalecentral.com/externals/tinymce/plugins/emoticons/img/smiley-wink.gif)(https://www.largescalecentral.com/externals/tinymce/plugins/emoticons/img/smiley-cool.gif)

Ken Brunt said:

You need to move that car out of the garage to make room for the machine shop your going to need…(https://www.largescalecentral.com/externals/tinymce/plugins/emoticons/img/smiley-wink.gif)(https://www.largescalecentral.com/externals/tinymce/plugins/emoticons/img/smiley-cool.gif)

OMGram … I thought they took Rics drivers license a couple years ago? Why does he still have a car and do his children know he has one?

Ric Golding said:

Who knows, maybe I’ll remember how to post pictures again as I document this. Stay tuned, if you wish.(http://largescalecentral.com/externals/tinymce/plugins/emoticons/img/smiley-cool.gif)

Photo inserting

  1. Start by uploading your photos to a server. You have storage space in the Freight Shed on this web site.
  2. After they are uploaded, click on the file you want to open.
  3. Once it is opened, RIGHT click on the picture and select copy image location. DO NOT use the url in the address bar of your browser.
  4. Next click on the insert photo button in your post and paste the image location in the source line.
  5. Look at the dimensions. You will see them if you click on the first box (height). Make it 800 then click on the second box and it will automatically be correctly scaled.
  6. Then hit OK and your photo will be in your post.

Ric Golding said:

19 November, 2019 - Carlyle, Illinois

.

I’m starting a new thread on the merging of the “Tram” boiler and single cylinder marine engine with a “Conner Beam” frame, I’ve had for a number of years. This resolves my wheel spacing and suspension concerns.

.

Once again I try to post a picture.

.

http://largescalecentral.com/filesharing/file/view/14476/19111901tram-jpg

So does this mean you have abandoned the original Cli-Shay project to utilize the boiler from it - or is this a whole new endeavor?

Hey Jon,

.

Thanks for the question and interest.

.

The “Cli-Shay” sits in storage at the Finger Lakes Live Steamers for the Winter. It 7.25 inches between the rails. This one is 7.5 inches. As I’ve progressed through these “semesters” of knowledge, I’ve obtained a number of projects and parts. I’m thinking and working to consolidate parts to create engines that will serve my needs and improve my knowledge and skills.

24 November, 2019 in Carlyle, Illinois

.

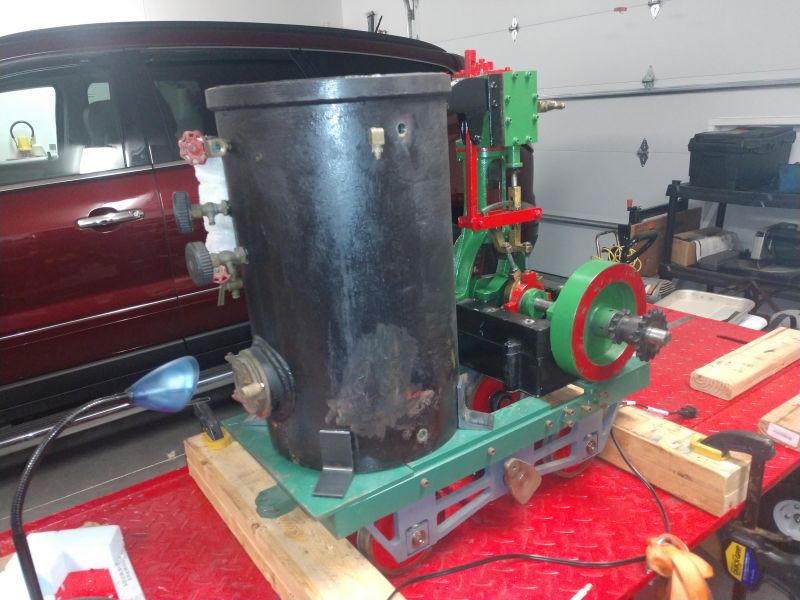
This past week’s project was to grind the old ears/boiler mounts off of the Tram boiler. This was done with a thin wheel grinding disc and cutting through the old welds. Care had to be considered to not grind into the boiler plate, but only remove and smooth the area of the old welded on ears. New ears/mounts were constructed out of 5 inch “C” channel, cut in to 2 -1.5 inch pieces and then cut those in half and drill for the 4 deck mounts. Each one had to be cleaned up (no sharp edges) and a slight 45 degree bevel put on the back of each side and top to create a smooth welding surface.

.

Good friend, Jason, came over to inspect my progress/work and weld the ears/mounts on to the boiler. Remember, I’m not a welder or machinist, so all of this is a challenge and learning experience for me.

.

Next step is to drill and tap the holes in the deck of the frame to secure the boiler.

.

Thanks for looking, as I document my progress/ redo’s and mistakes.

I’m not a machinist either, but have had a lot of success taping both plastics and steel. So long as you make sure you have the correct size drill bit, a good sharp tap, a quality handle and lots of cutting oil, things work out nicely. Its extremely satisfying the first time you threa a bolt into a hole you tapped yourself (https://www.largescalecentral.com/externals/tinymce/plugins/emoticons/img/smiley-smile.gif)

Succeeded at drilling and tapping holes. Needed to get my welding done when friend was available. Realized I would have been better to tap the holes and mount the mounts before welding them to the boiler. However, I got it complete. I was apprehensive about drilling and taping in solid bar of the end piece of the frame, but it worked. Moving on to next part of project.

I thought of you when I looked into his work : http://large-scaledieselmodels.blogspot.com/2010/

Okay Guys, Here is a link to a very short video of some success with my adventure in understanding and building Mariner. Long way to go, but some good things have happened at the Ridge Live Steamers Track this Winter.

https://youtu.be/ygzWccvSH7Q

Thank you Ken. I’ve had it around the track at the Ridge Live Steamers a number of times now. Resolving problems every time and creating some new ones. Seems to be the life of a steam engine. You run it until you get it tuned and then you run it until something breaks. Lots of people do it, some do it for fun. My fascination started when I was about 11. Learning a lot and having some fun. Its all good!

What an awesome looking live steam locomotive! Great sounding whistle too. I would have expected that tone from a steamer with a much larger boiler.

Ric Golding said:

Succeeded at drilling and tapping holes. Needed to get my welding done when friend was available. Realized I would have been better to tap the holes and mount the mounts before welding them to the boiler. However, I got it complete. I was apprehensive about drilling and taping in solid bar of the end piece of the frame, but it worked. Moving on to next part of project.

There could be children reading this post including yours!

Mark Betlem said:

What an awesome looking live steam locomotive! Great sounding whistle too. I would have expected that tone from a steamer with a much larger boiler.

Thank you Mark, I’m quite proud of it. Its a hand made 5 chime whistle made out of copper pipe and a brass plate. It was given to me from Bob Wattecamp, that owns the H-10. It was originally painted black to hide all the hand soldering and other crafty joints. I kind of like them to show, so after stripping the paint off to clean it up, I just left it that way.