Large Scale Central

Bridge Replacement

Sorry if this is a double post…I did something to close out earlier…

Anyway, I need to replace a truss that is showing signs of wear and has a habit of catching trains. I found plans for a 24" long deck bridge in the June 2003 GR, which should do. This is my first crack at a project like this, to include my first significant use of our little table saw, so I am going to build this exactly to plan, if possible. I’ll also use a composite (I found something called “fiberon” at Lowe’s) rather than wood for the sake of durability. The bridge is set back enough that the loss of wood grain will not be an issue.

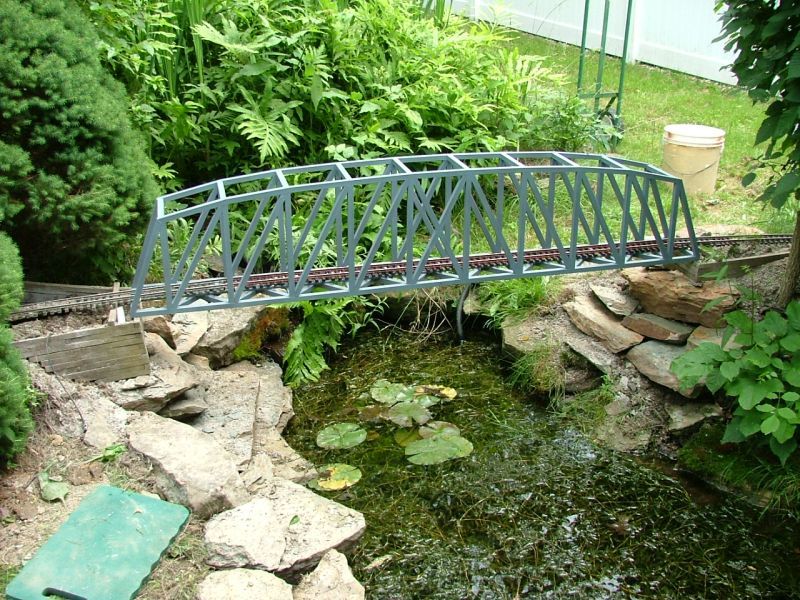
Before I start cutting, I had a quick question about the length. I have 17" between the abutments, meaning the bridge will be 3-4" longer on each side. In the picture below, I’ve pulled the tape measure to 24":

Is that going to be enough? Or should I extend the bridge a bit more? The track starts to curve just off to the left, so there is not that much room.

Thanks for the help in advance!

Eric

a bit longer should be no problem, if…

… if you make the new bridge not too narrow.

(longer cars going into the curve will have inside and outside overhang on the straight on the bridge.)

Korm,

Thanks. I will recheck the width. The plans are for 1:29 scale. We use PLAYMOBIL scale (1:24-ish) so I should’ve thought of that.

Eric

The deck is 7.5" wide, with a small extension for braces. It’ll do! Thanks again for having me double check!

If in doubt on the curve you could always skew it a bit

Sorry for the slow progress. I tried to rip down the 24" “timbers” that form the base of the bridge. They are 24" long. Their widths are…variable…Working with Bill Barnwell and my father-in-law, the issue seemed to be inexperience, not wrong material or - worse from a cost perspective - wrong tool (Rockwell “BladeRunner” X2).

I had to pause the project to let life happen, but, when I get going again, I am debating between trying again by ripping up another section of board or trying to plane them down what I cut to make it work. I am leaning towards the former for the practice it’ll provide and because I figure if the base of the bridge is bad, the project is doomed from day one. The not-quite-right ones I can repurpose, I am sure.

Updates to follow as required, but progress will get slow as school winds down and family drifts through.

Eric

Give it another shot, practice makes perfect but pictures of your mistakes might be helpful. Think size is good and if you want wood grain just score wood with saw blade pulled across the piece it gives it a nice wood grain (see below), and I love your new scale PLAYMOBIL scale (1:24-ish)!!!

spout center

X

Eric

Properly resting on your abutment is essential to correct posture. And it is good for bridges too.

Your abutment can be part of your retaining wall. With bridges attached the entire assembly can be put in the ground together.

One more example.

I know you said you wanted to follow the plan exactly but I recommend a piece of 3/4 pipe or conduit hidden in the deck.

I look forward to seeing your completed project.

Yea, but someone suggested that I sit on mine a bit too much. In fact, he crowned me king. Right Devon? (https://www.largescalecentral.com/externals/tinymce/plugins/emoticons/img/smiley-wink.gif)

Gents,

Thanks for the tips! To better frame where I am at, I am going to follow Bill’s suggestions and add a few photos.

First, this is the side-on shot of the bridge that needs replacing to complement the top-down shot that began this post:

The abutments are bricks standing on end covered with stucco and little stones. The canyon walls are concrete; behind them is dirt. I am a bit afraid to monkey too much with the abutments and walls, as I fear collapsing the canyon. I plan to level the bridge using cribbing, gluing it in place, to replace the shims you can see there now.

Here is the saw:

As I passed the 24" board down the length of the saw deck, I had trouble getting the ripped part to pass between the rail and the vertical arm that holds the safety guard running over the top. I tried offsetting the rail a bit to let the ripped portion pass, and I think that led to my cuts being a bit wavy. Hopefully, you can see that below, though the picture is a bit fuzzy:

The referenced article suggested using a block of wood between the rail and the part to be cut rather than trying to cut using the rail itself. I might try that if I cannot think of a way to practically salvage what I’ve done.

Again, I don’t anticipate much progress with family arriving, so apologies in advance for the slowness of any progress!

Aloha,

Eric

That is Island time… am I right Eric…

I had a great time on Kauai last week…Aloha…

Eric Mueller said:

Gents,

Thanks for the tips! To better frame where I am at, I am going to follow Bill’s suggestions and add a few photos.

First, this is the side-on shot of the bridge that needs replacing to complement the top-down shot that began this post:

Eric even though I PM you about this I thought I would reply in the forum for the benefit of others, the type of saw that you are using uses a saber saw blade which can bend quite easily, try feeding your material through slower and do not force as that can cause the blade to distort also you, might notice that the plastic melts and in that case you should use a different blade one designed for plastics. Bill

The abutments are bricks standing on end covered with stucco and little stones. The canyon walls are concrete; behind them is dirt. I am a bit afraid to monkey too much with the abutments and walls, as I fear collapsing the canyon. I plan to level the bridge using cribbing, gluing it in place, to replace the shims you can see there now.

Here is the saw:

As I passed the 24" board down the length of the saw deck, I had trouble getting the ripped part to pass between the rail and the vertical arm that holds the safety guard running over the top. I tried offsetting the rail a bit to let the ripped portion pass, and I think that led to my cuts being a bit wavy. Hopefully, you can see that below, though the picture is a bit fuzzy:

The referenced article suggested using a block of wood between the rail and the part to be cut rather than trying to cut using the rail itself. I might try that if I cannot think of a way to practically salvage what I’ve done.

Again, I don’t anticipate much progress with family arriving, so apologies in advance for the slowness of any progress!

Aloha,

Eric

I would be hesitant to use composite decking material for any load-bearing construction. Two issues:

  1. composite does not have the bending resistance of wood. It may seem quite solid when supported at 16" on your deck, but once it is ripped to scale dimension, it will bend. This can probably be overcome for short bridges like you have in mind.

  2. composites have a high coefficient of expansion, higher than metal and much higher than wood. (wood expands with moisture, but mostly across the grain, where it doesn’t matter.) What seems solid at room temperature will warp, bend or get soft in the summer sun.

If you do continue with composite, I’d advise NOT rigidly attaching your bridge to both abutments. Otherwise summer expansion will warp the bridge or push the abutments out of place - take your pick.

Clear cedar is your friend! I’ll post some pictures later showing cedar bridges and trestles on our club layout.

I’m not familiar with the Rockwell Bladerunner, but looking at online reviews at least one customer had your problem of the material not clearing the blade guard support. They called Rockwell and were instructed how to adjust the location of the blade guard support. So if you’re still having trouble making rip cuts using the fence, that may be the problem.

Another possibility is that the composite stock is bending a bit as it passes through the blade. You might try ripping a good, clean piece of wood. If the wood also hits the blade support, then it’s an alignment problem. If the wood clears ok, then the problem is composite bending.

Good luck. Bladerunner gets good reviews overall so no reason you can’t produce some excellent work with it!

Neal, with proper design, each member of the bridge can be kept short so the composite material doesn’t bend, twist nor sag.

Eric Mueller said:

As I passed the 24" board down the length of the saw deck, I had trouble getting the ripped part to pass between the rail and the vertical arm that holds the safety guard running over the top. I tried offsetting the rail a bit to let the ripped portion pass, and I think that led to my cuts being a bit wavy. Hopefully, you can see that below, though the picture is a bit fuzzy:

Remove the safety guard and make the safety guard what floats between your eyeballs. Then go for a zero clearance throat which I have not done yet myself as I like a challenge.

Nice project though!

Eric

From looking at your photos I think you are missing a tool called a “featherboard”. This tool puts pressure against the piece you are cutting so that it stays right next to your fence. With it you can make perfect cuts all the time.

https://www.rockler.com/why-use-featherboards

Stan

Gotta ditch the ghetto saw “safety guide” first Stan!

Feather boards are second …(https://www.largescalecentral.com/externals/tinymce/plugins/emoticons/img/smiley-wink.gif)

All,

I just want to acknowledge all the good suggestions. I think the featherboard is a definite purchase prior to the next cuts. I have to really think about removing the safety guide. I am not yet all that confident in my own skills, and it will make it harder to fight the seatbelt / bike helmet / don’t-practice-karate-on-your-brother / etc. arguments more difficult if I override a safety in my own hobbies. As for the use of composites, thanks, Neal, for the warning. I did plan to “float” the bridge, so I should be OK. My primary concerns are bugs, rot, and salt water. As we are moving from “get something running” to “make it run and look well,” I plan to experiment a bit. Working with Bill Barnwell via pm, who faces the same general environmental challenges, I am inclined to lean towards plastics and composites. Cost and availability are always issues, too, and everything pretty much starts with a 20 percent mark-up relative to CONUS.

All stop for the moment unless the family activities this week take us past a Lowes, which is not a hot spot on their “must see list.”

Aloha!

Eric

Eric Mueller said:

All,

I think the featherboard is a definite purchase prior to the next cuts. I have to really think about removing the safety guide. I am not yet all that confident in my own skills, and it will make it harder to fight the seatbelt / bike helmet / don’t-practice-karate-on-your-brother / etc. arguments more difficult if I override a safety in my own hobbies.

Eric,

My suggestion for removing the safety guide was given to me by a professional carpenter many years ago. “When ripping lumber that size on a table saw with the safety features you are just asking to hurt yourself or the lumber”. You need a zero clearance throat and the safety feature is floating between you eyeballs. However that professional carpenter became a left handed wallpaper hanger in his latter years (ok that’s a lie ).

It’s all good and keep posting up the work !